
When building Flutter apps, understanding the difference between Stateless and Stateful Widgets is one of the most important concepts. These two types of widgets form the foundation of how your UI is built and updated, directly impacting your app’s performance and maintainability. So this article is all about Stateless vs Stateful Widgets in Flutter.
Why This Matters
In simple terms, Stateless Widgets are for fixed UIs, while Stateful Widgets make your app dynamic and interactive. Knowing when to use which is key to writing efficient, beautiful Flutter apps. Moreover, mastering this distinction will help you avoid common pitfalls like unnecessary rebuilds and performance bottlenecks as your application grows.
What Are Widgets in Flutter?
In Flutter, everything is a widget—buttons, text, images, layouts, and even the entire app structure. This design philosophy, explained in detail in Flutter’s official architecture documentation, makes the framework incredibly consistent and predictable.
Widgets describe how your UI should look, and Flutter’s reactive framework efficiently rebuilds parts of the UI when data or state changes. Consequently, understanding widgets is fundamental to becoming proficient in Flutter development.
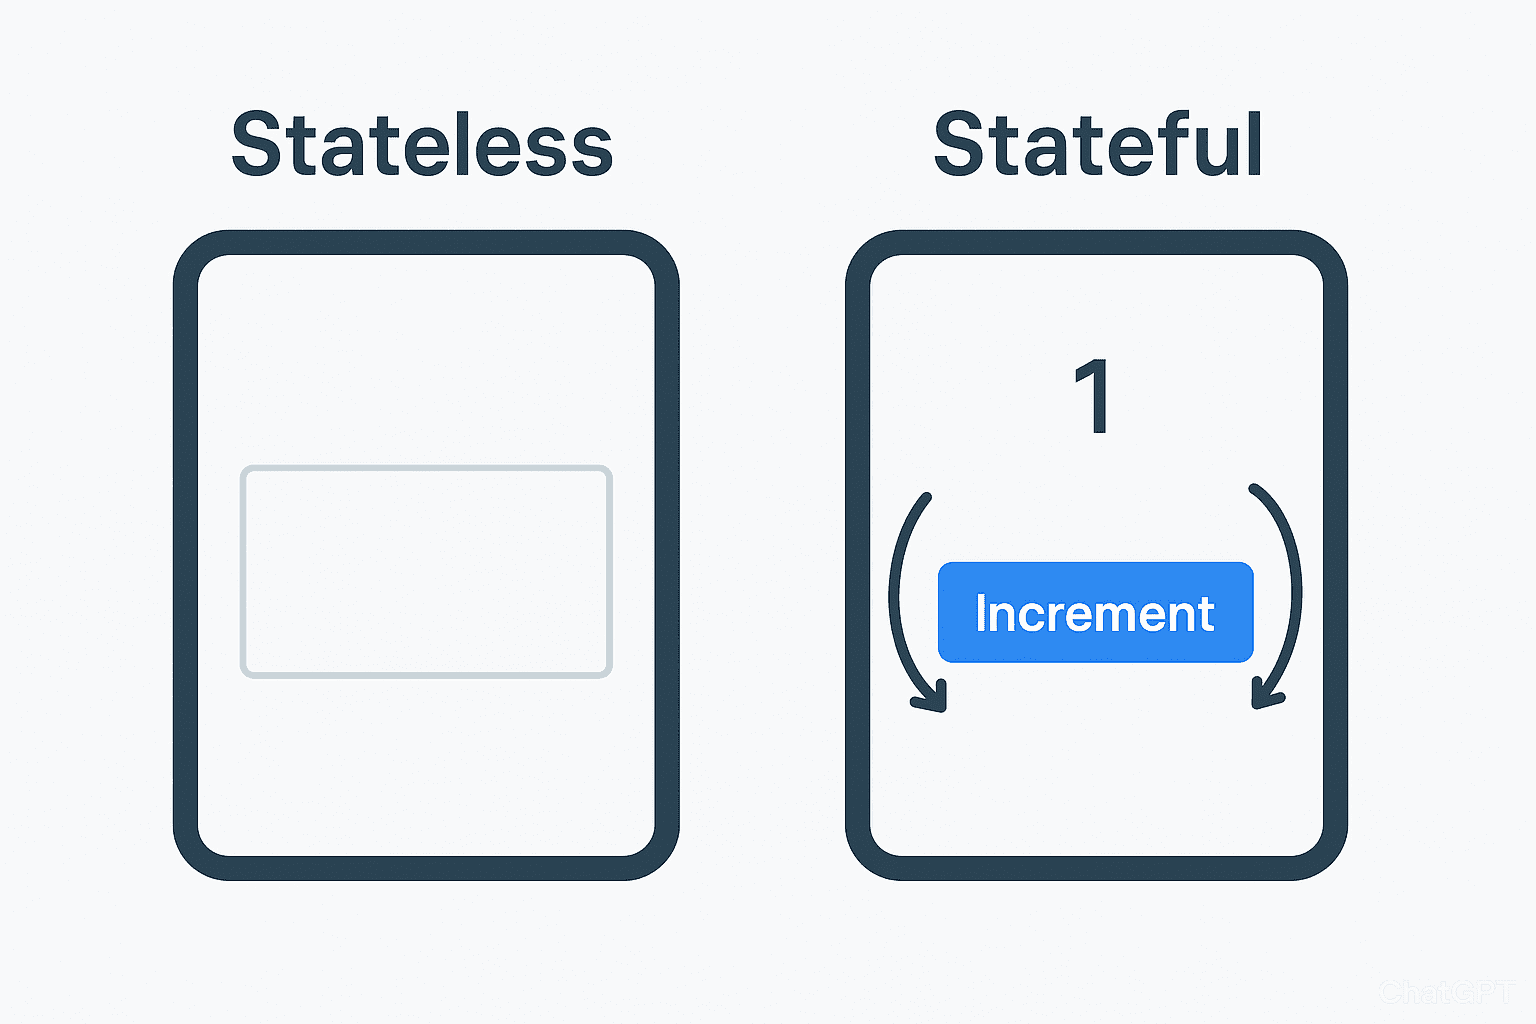
Stateless Widgets
A StatelessWidget is immutable—once it’s built, it cannot change its internal state or appearance. The UI only updates when it receives new data from its parent widget (external data).
Key Concepts
Immutable Widgets: They don’t hold any internal state that can change over time.
Static UI: Best for static screens or simple, non-interactive UI elements like titles, logos, or informational text.
Performance: Generally more performant as they are simpler and don’t manage state. As a result, they consume fewer resources and render faster.
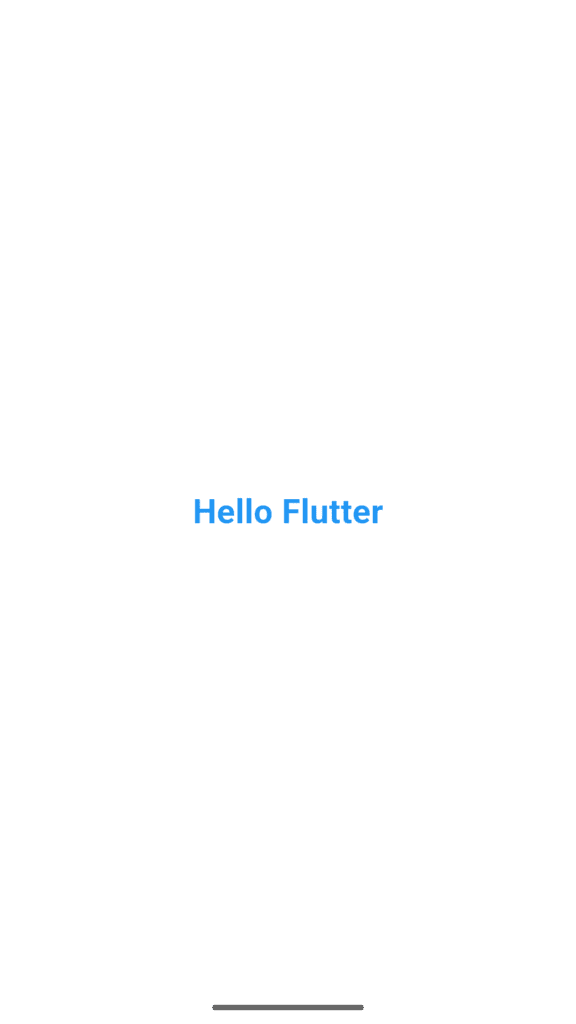
Example: Simple Text Display
import 'package:flutter/material.dart';

void main() {
  runApp(const MyApp());
}

class MyApp extends StatelessWidget {
  const MyApp({super.key});

  @override
  Widget build(BuildContext context) {
    return const MaterialApp(
      debugShowCheckedModeBanner: false,
      home: Scaffold(
        backgroundColor: Colors.white,
        body: Center(
          child: MyStatelessWidget(title: 'Hello Flutter'),
        ),
      ),
    );
  }
}

class MyStatelessWidget extends StatelessWidget {
  // A StatelessWidget only defines the UI based on its initial configuration.
  final String title;

  const MyStatelessWidget({Key? key, required this.title}) : super(key: key);

  @override
  Widget build(BuildContext context) {
    return Text(
      title,
      style: const TextStyle(
        fontSize: 24,
        fontWeight: FontWeight.bold,
        color: Colors.blue,
      ),
    );
  }
}
The output should look something like this:
When to Use a StatelessWidget
- Displaying static text, icons, or images
- UI elements like labels, logos, dividers, or separators
- Widgets that don’t change once rendered on the screen
- Components that only depend on configuration passed from parent widgets
Furthermore, if you’re building reusable components that don’t need internal state management, StatelessWidget is your go-to choice.
Stateful Widgets
A StatefulWidget can change its internal state and re-render itself dynamically based on user interaction or data changes. It is essential for creating dynamic UIs in Flutter. Additionally, StatefulWidgets provide lifecycle methods that give you fine-grained control over your widget’s behavior.
Key Concepts
Mutable State: Allows the widget to change its appearance over time based on internal data changes.
Dynamic UI: Perfect for anything that updates based on user interaction (e.g., counters, toggles, form inputs).
Two Classes: It requires two separate classes to function:
- StatefulWidget: Defines the widget configuration and creates the State object
- State: Manages the mutable data and UI logic, and calls
setState()to trigger a rebuild
For more on Flutter’s state management philosophy, check out Flutter’s official state management documentation.
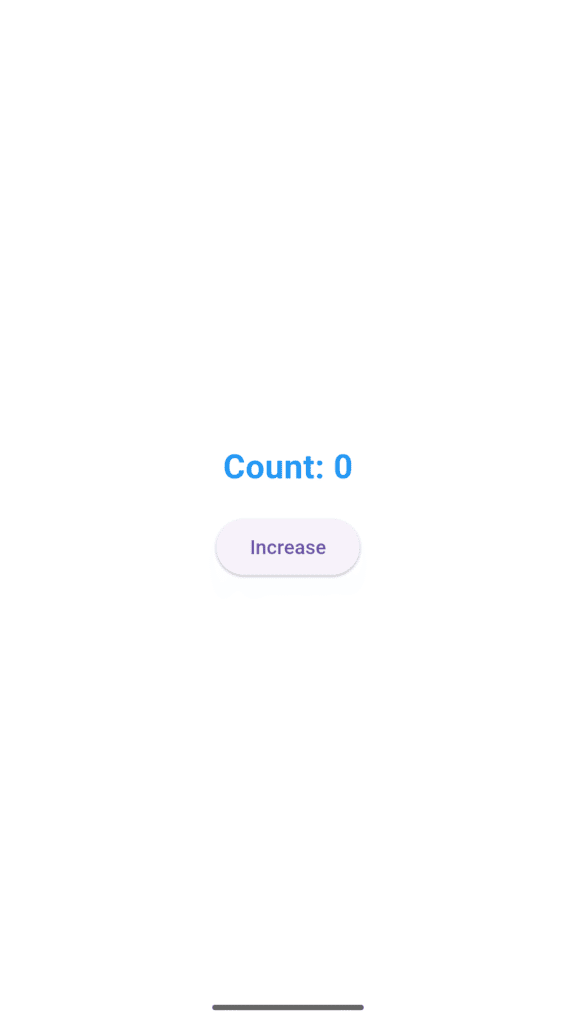
💡 Example: The Flutter Counter
import 'package:flutter/material.dart';

void main() {
  runApp(const MyApp());
}

class MyApp extends StatelessWidget {
  const MyApp({super.key});

  @override
  Widget build(BuildContext context) {
    return const MaterialApp(
      debugShowCheckedModeBanner: false,
      home: Scaffold(
        backgroundColor: Colors.white,
        body: Center(
          child: MyStatefulWidget(),
        ),
      ),
    );
  }
}

class MyStatefulWidget extends StatefulWidget {
  // The widget itself is immutable and defines the State.
  const MyStatefulWidget({Key? key}) : super(key: key);

  @override
  _MyStatefulWidgetState createState() => _MyStatefulWidgetState();
}

class _MyStatefulWidgetState extends State<MyStatefulWidget> {
  int count = 0; // This is the mutable internal state.

  void _increment() {
    // Calling setState() signals Flutter to rebuild the UI with the new data.
    setState(() {
      count++;
    });
  }

  @override
  Widget build(BuildContext context) {
    return Column(
      mainAxisAlignment: MainAxisAlignment.center,
      children: [
        Text(
          'Count: $count',
          style: const TextStyle(
            fontSize: 24,
            fontWeight: FontWeight.bold,
            color: Colors.blue,
          ),
        ),
        const SizedBox(height: 16),
        ElevatedButton(
          onPressed: _increment, // Triggers the state change
          child: const Text('Increase'),
        ),
      ],
    );
  }
}
The output should look something like this:
When to Use a StatefulWidget
- Forms with text fields, checkboxes, or validation
- Counters, toggles, switches, or sliders
- Dynamic themes or color changes
- Screens that update frequently based on user input, animations, or network data
- Any component that needs to respond to lifecycle events
Therefore, whenever you need interactivity or data that changes over time, StatefulWidget is the appropriate choice.
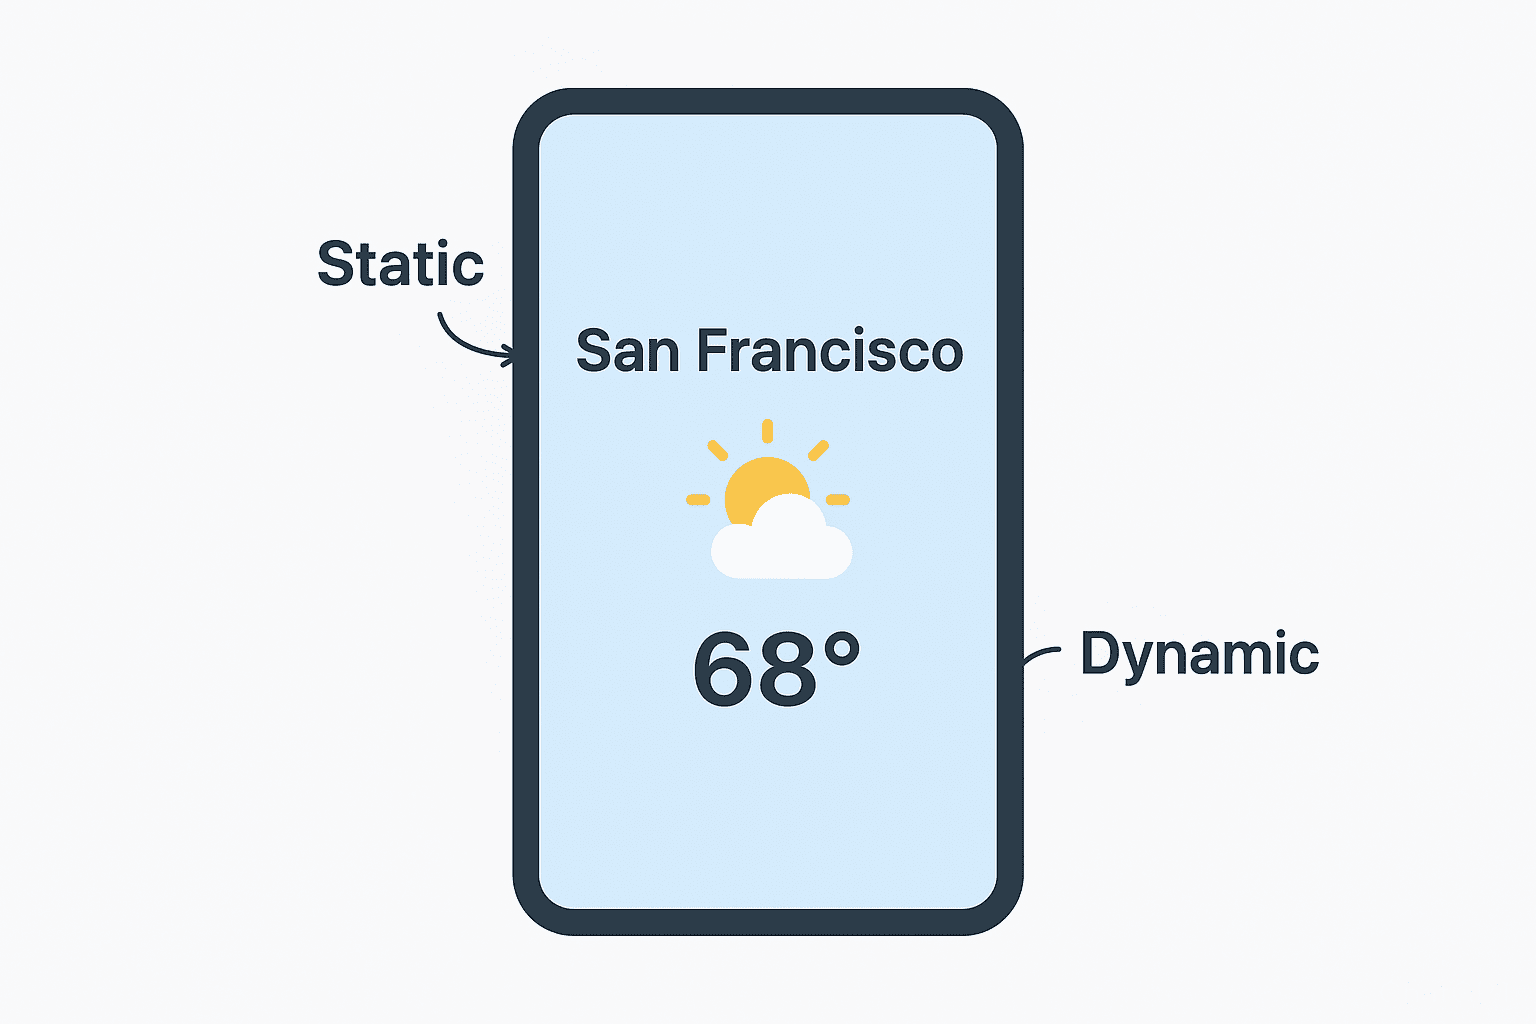
Real-World Example: Weather App
To better understand how these widgets work together in practice, imagine you’re building a weather app:
- The city name header can be a StatelessWidget (it doesn’t change unless the user selects a different city, which would be handled by the parent)
- The temperature display is a StatefulWidget (it changes when you refresh the data from the API)
- The refresh button is also a StatefulWidget (it needs to track loading states and trigger updates)
- The weather icon could be a StatelessWidget that receives the weather condition as a parameter
This demonstrates how both widget types complement each other—StatelessWidgets handle presentation, while StatefulWidgets manage dynamic behavior. Consequently, your app architecture becomes cleaner and more maintainable.
⚖️ Stateless vs Stateful Widgets: Quick Comparison Table
| Feature | StatelessWidget | StatefulWidget |
|---|---|---|
| Can change data? | No (Immutable) | Yes (Mutable via State) |
| Lifecycle methods | Minimal (Only build) | Many (initState, setState, dispose, etc.) |
| Performance | Slightly faster/Lighter | Slightly heavier/More complex |
| Use Case | Static content (Text, Logos) | Dynamic content (Counters, Forms) |
| Class structure | Single Class | StatefulWidget and separate State Class |
| Memory usage | Lower | Higher (maintains state) |
Best Practices for Flutter Widget Management
1. Prioritize StatelessWidget: Use a StatelessWidget whenever possible for better performance and simpler code. If a widget doesn’t need to manage state, make it stateless. As a general rule, start with StatelessWidget and only convert to StatefulWidget when necessary.
2. Use setState() Sparingly: Only call setState() at the lowest level of the widget tree necessary to trigger a rebuild, as it can be a performance bottleneck if overused. In other words, keep your state as localized as possible to minimize unnecessary rebuilds.
3. Complex State Management: For large applications with complex interactions, consider dedicated State Management solutions like Provider, Riverpod, or Bloc. This helps separate business logic from the UI, making your code more testable and maintainable.
4. Follow the Single Responsibility Principle: Each widget should have one clear purpose. Therefore, break down complex widgets into smaller, reusable components.
5. Consider Const Constructors: Use const constructors whenever possible to enable compile-time optimizations. Consequently, Flutter can reuse widget instances and improve performance.
FAQs on Flutter Widgets
1. Can I convert a StatelessWidget into a StatefulWidget later?
Yes, absolutely! If your widget later requires interactivity or dynamic content, you can easily refactor it into a StatefulWidget and its corresponding State class. Most IDEs like Visual Studio Code and Android Studio even provide quick-fix tools to do this automatically.
2. Why shouldn’t I just use StatefulWidget everywhere for simplicity?
While it’s technically possible, using StatefulWidget everywhere introduces unnecessary overhead, reduces performance slightly, and makes your codebase harder to maintain and test due to the separation of the Widget and State classes. Moreover, it can lead to confusion about where state actually lives in your application architecture.
3. Does setState() slow down my app?
It depends on how you use it. setState() only tells Flutter to rebuild the specific widget where it is called and its descendants, creating a highly efficient reactive process. However, if you call it on a widget high in the tree with many children, it can cause performance issues. Therefore, keep state as low in the tree as possible.
4. What’s the role of the State class?
The State class holds the mutable data and controls how the UI (the build method) should update when that data changes, primarily through the setState() method. Additionally, it provides lifecycle methods like initState(), dispose(), and didUpdateWidget() for advanced control.
5. What’s the easiest way to spot when I need StatefulWidget?
Ask yourself: “Does this widget need to change its appearance based on user interaction or time?” If yes, you need a StatefulWidget. Furthermore, if you find yourself wishing you could update a value in a StatelessWidget, that’s a clear sign you need state management.
Try It Yourself: Practice Tasks
Now that you understand the theory, let’s put it into practice:
Task 1 – Basic Counter:
Create a simple app with both widget types:
- One StatelessWidget displaying a title
- One StatefulWidget with a counter button
- Try changing the title in the StatelessWidget—notice how it doesn’t update!
Task 2 – Theme Toggle:
Build a button that toggles between light and dark mode using setState(). This will help you understand how state changes affect the entire widget tree.
Task 3 – Form Validation:
Create a simple login form with email and password fields. Use StatefulWidget to manage form state and display validation errors in real-time.
Conclusion
You’ve now mastered one of Flutter’s most important foundations—understanding when and how your UI updates. In Part 4, we clearly defined how Stateless and Stateful Widgets serve as the two fundamental building blocks of every Flutter application. Mastering their roles is the first step in deciding when to make your UI static or dynamic and ensuring your app is both performant and easily scalable. This knowledge is essential, as the widget lifecycle directly impacts advanced concepts like state management and performance optimization that you will encounter later.
As you continue this journey, your knowledge of these fundamental concepts will become second nature; however, to ensure you have a solid programming foundation, we recommend reviewing Part 3 – Dart Basics for Flutter Developers if you need to brush up on the underlying language essentials. Once you are ready to apply this knowledge, join us for the next phase in Part 5 – Essential Flutter Widgets. There, we will put the StatefulWidget and StatelessWidget concepts to work by exploring key layout widgets—like Container, Row, and Column—and demonstrating how to assemble them into complex, responsive UI layouts.
Found this helpful? Share it with fellow Flutter developers and check out the rest of our Flutter tutorial series!