Authentication is one of the most important features of any app. Users expect to sign up, log in, and stay logged in securely. In Flutter, the easiest way to handle authentication is by using Firebase Authentication.
I spent two weeks trying to build my own authentication system for a practice app—hashing passwords, managing sessions, securing tokens. It was a nightmare. Then I switched to Firebase Authentication and had login working in 30 minutes. That’s when I understood why every Flutter developer recommends it.
This tutorial walks you through setting up email and password authentication in Flutter using Firebase Authentication.
Tip: Authentication seems scary at first, but Firebase makes it surprisingly simple. Focus on getting the basics working first—email and password login. You can add Google Sign-In and other methods later once you understand the fundamentals.
What Is Firebase Authentication?
Firebase Authentication is a service that lets you add secure login functionality to your app without writing backend code. According to Firebase’s official documentation, Firebase Authentication provides backend services, easy-to-use SDKs, and ready-made UI libraries to authenticate users.
What Firebase handles for you:
User Registration: Email validation, password strength checking, duplicate detection
Login and Sessions: Credential verification, token generation, session persistence
Security: Password hashing, secure token management, HTTPS encryption
User Management: Password reset emails, email verification, account deletion
For my Flutter practice projects, Firebase Authentication means I can focus on building features instead of worrying about security vulnerabilities.
Prerequisites
Before starting, make sure you have:
Firebase already set up in your Flutter app – If not, complete our How to Set Up Firebase in Flutter tutorial first.
Flutter app running without errors – Verify with flutter run
Basic Flutter knowledge – Understanding of StatefulWidget and async/await. Check our Flutter Introduction and Core Concepts if needed.
What We’re Building
In this tutorial, we’ll create:
- Sign up functionality for new users
- Sign in functionality for existing users
- Current user detection
- Sign out functionality
- Authentication state listening
Step 1: Enable Email & Password Authentication
Before writing code, enable authentication in your Firebase project.
1.1 Open Firebase Console
Go to Firebase Console and select your project.
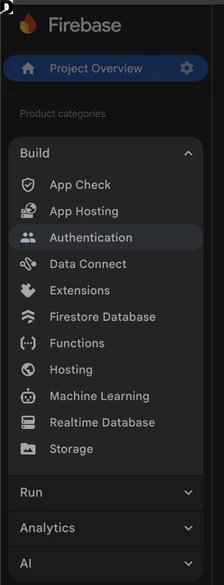
1.2 Navigate to Authentication
Click Authentication in the left sidebar, then click Get started.
1.3 Enable Email/Password
- Click the Sign-in method tab
- Find Email/Password in the list
- Toggle Enable to ON
- Click Save

Your Firebase backend is now ready to handle authentication.
Step 2: Add Firebase Authentication Package
2.1 Open pubspec.yaml
Add firebase_auth under dependencies:
dependencies:
  flutter:
    sdk: flutter
  firebase_core: ^2.24.2
  firebase_auth: ^4.16.0
Version note: Always check pub.dev/packages/firebase_auth for the latest version in 2026. The authentication logic remains the same across versions.
2.2 Install the Package
flutter pub get
Step 3: Import and Initialize Firebase Auth
3.1 Import Firebase Auth
import 'package:firebase_auth/firebase_auth.dart';
3.2 Create FirebaseAuth Instance
final FirebaseAuth _auth = FirebaseAuth.instance;
Place this at the top of your widget class. This instance provides access to all authentication methods.
Step 4: Create User Registration (Sign Up)
4.1 Sign Up Function
Future<void> signUp(String email, String password) async {
  try {
    UserCredential userCredential = await _auth.createUserWithEmailAndPassword(
      email: email,
      password: password,
    );
    print("User registered: ${userCredential.user?.email}");
  } on FirebaseAuthException catch (e) {
    if (e.code == 'weak-password') {
      print('Password is too weak (minimum 6 characters)');
    } else if (e.code == 'email-already-in-use') {
      print('An account already exists for that email');
    } else {
      print('Error: ${e.message}');
    }
  }
}
4.2 What Firebase Does Automatically
When you call createUserWithEmailAndPassword(), Firebase:
- Validates email format
- Checks password strength (minimum 6 characters)
- Checks for duplicate emails
- Hashes the password securely
- Creates user record
- Returns user information
No backend code needed.
4.3 Common Sign Up Errors
weak-password: Less than 6 characters email-already-in-use: Email already registered invalid-email: Incorrect email format operation-not-allowed: Email/password not enabled in Console
Step 5: User Login (Sign In)
5.1 Sign In Function
Future<void> signIn(String email, String password) async {
  try {
    UserCredential userCredential = await _auth.signInWithEmailAndPassword(
      email: email,
      password: password,
    );
    print("User logged in: ${userCredential.user?.email}");
  } on FirebaseAuthException catch (e) {
    if (e.code == 'user-not-found') {
      print('No user found for that email');
    } else if (e.code == 'wrong-password') {
      print('Wrong password provided');
    } else {
      print('Error: ${e.message}');
    }
  }
}
5.2 Common Sign In Errors
user-not-found: No account with this email wrong-password: Incorrect password invalid-email: Bad email formatuser-disabled: Account disabled by admin
Step 6: Check Current User
Firebase keeps users logged in automatically between app sessions.
User? user = _auth.currentUser;

if (user != null) {
  print("User is logged in: ${user.email}");
  print("User ID: ${user.uid}");
} else {
  print("No user logged in");
}
User object properties:
email– User’s email addressuid– Unique user ID (use for database queries)emailVerified– Email verification statusdisplayName– User’s display namephotoURL– Profile picture URL
Practical Use: Deciding Which Screen to Show
@override
void initState() {
  super.initState();

  User? user = _auth.currentUser;
  if (user != null) {
    Navigator.pushReplacementNamed(context, '/home');
  }
}
This is how you implement persistent login.
Step 7: Sign Out User
Future<void> signOut() async {
  try {
    await _auth.signOut();
    print("User signed out");
  } catch (e) {
    print("Error signing out: $e");
  }
}
What happens:
- Session cleared
currentUserbecomes null- User must provide credentials to sign in again
Step 8: Listen to Authentication State Changes
Firebase provides a real-time stream that notifies you when authentication state changes.
@override
void initState() {
  super.initState();

  _auth.authStateChanges().listen((User? user) {
    if (user == null) {
      print('User signed out');
    } else {
      print('User signed in: ${user.email}');
    }
  });
}
When This Fires
The listener triggers when:
- User signs in
- User signs out
- App starts (tells you if someone is already logged in)
- User’s token is refreshed
Practical Example: Auto-Navigation
class AuthWrapper extends StatelessWidget {
  @override
  Widget build(BuildContext context) {
    return StreamBuilder<User?>(
      stream: FirebaseAuth.instance.authStateChanges(),
      builder: (context, snapshot) {
        if (snapshot.connectionState == ConnectionState.active) {
          User? user = snapshot.data;

          if (user == null) {
            return LoginScreen();
          } else {
            return HomeScreen();
          }
        }

        return Scaffold(
          body: Center(child: CircularProgressIndicator()),
        );
      },
    );
  }
}
This pattern automatically shows the correct screen based on authentication state. I use this in every Flutter practice project that needs authentication.
Complete Example: Authentication Screen
Here’s a complete working example:
import 'package:flutter/material.dart';
import 'package:firebase_auth/firebase_auth.dart';

class AuthScreen extends StatefulWidget {
  @override
  _AuthScreenState createState() => _AuthScreenState();
}

class _AuthScreenState extends State<AuthScreen> {
  final FirebaseAuth _auth = FirebaseAuth.instance;
  final TextEditingController emailController = TextEditingController();
  final TextEditingController passwordController = TextEditingController();

  bool isLogin = true;
  String errorMessage = '';

  Future<void> handleAuth() async {
    setState(() => errorMessage = '');

    try {
      if (isLogin) {
        await _auth.signInWithEmailAndPassword(
          email: emailController.text.trim(),
          password: passwordController.text,
        );
      } else {
        await _auth.createUserWithEmailAndPassword(
          email: emailController.text.trim(),
          password: passwordController.text,
        );
      }
    } on FirebaseAuthException catch (e) {
      setState(() => errorMessage = e.message ?? 'An error occurred');
    }
  }

  @override
  Widget build(BuildContext context) {
    return Scaffold(
      appBar: AppBar(
        title: Text(isLogin ? 'Sign In' : 'Sign Up'),
      ),
      body: Padding(
        padding: EdgeInsets.all(16.0),
        child: Column(
          mainAxisAlignment: MainAxisAlignment.center,
          children: [
            TextField(
              controller: emailController,
              decoration: InputDecoration(
                labelText: 'Email',
                border: OutlineInputBorder(),
              ),
              keyboardType: TextInputType.emailAddress,
            ),
            SizedBox(height: 16),
            TextField(
              controller: passwordController,
              decoration: InputDecoration(
                labelText: 'Password',
                border: OutlineInputBorder(),
              ),
              obscureText: true,
            ),
            SizedBox(height: 8),
            if (errorMessage.isNotEmpty)
              Text(errorMessage, style: TextStyle(color: Colors.red)),
            SizedBox(height: 16),
            ElevatedButton(
              onPressed: handleAuth,
              child: Text(isLogin ? 'Sign In' : 'Sign Up'),
              style: ElevatedButton.styleFrom(
                minimumSize: Size(double.infinity, 50),
              ),
            ),
            TextButton(
              onPressed: () {
                setState(() {
                  isLogin = !isLogin;
                  errorMessage = '';
                });
              },
              child: Text(
                isLogin ? 'Need an account? Sign Up' : 'Have an account? Sign In',
              ),
            ),
          ],
        ),
      ),
    );
  }

  @override
  void dispose() {
    emailController.dispose();
    passwordController.dispose();
    super.dispose();
  }
}
This complete example includes email/password input, toggle between sign in and sign up, error message display, and proper controller disposal.
Common Errors and Solutions
Error: “No Firebase App ‘[DEFAULT]’ has been created”
Cause: Firebase not initialized
Solution: Ensure Firebase.initializeApp() is called in main() before any Firebase code. Review our Firebase Setup Guide if needed.
Error: “The email address is badly formatted”
Cause: Invalid email format
Solution: Add validation:
bool isValidEmail(String email) {
  return RegExp(r'^[\w-\.]+@([\w-]+\.)+[\w-]{2,4}$').hasMatch(email);
}
Error: “The password must be 6 characters long or more”
Solution: Validate before calling Firebase:
if (password.length < 6) {
  print('Password must be at least 6 characters');
  return;
}
Error: “We have blocked all requests from this device”
Cause: Too many failed attempts
Solution: Wait a few hours, or implement rate limiting
Best Practices
Security:
- Never store passwords in your app
- Use email verification for new accounts
- Validate input on client side first
- Show user-friendly error messages
Code Organization:
- Create a separate authentication service class
- Use StreamBuilder for auth state
- Implement proper loading states
- Always dispose controllers
User Experience:
- Show clear error messages
- Implement password reset functionality
- Provide immediate feedback
- Handle edge cases gracefully
Password Reset Example
Future<void> resetPassword(String email) async {
  try {
    await _auth.sendPasswordResetEmail(email: email);
    print('Password reset email sent');
  } catch (e) {
    print('Error: $e');
  }
}
What You Can Build Next
Once you have authentication working:
User-Specific Apps: To-do lists, note-taking apps, expense trackers
Social Features: User profiles, following systems, comments
E-commerce: Shopping carts, order history, wishlists
Access Control: Admin panels, paid features, role-based access
Firebase Authentication is the foundation for all user-specific functionality. Once users can sign in, you can start building features using their unique user ID.
For storing user data, check out our Cloud Firestore Basics tutorial.
Next Steps
Expand your authentication system:
Email Verification: Confirm users own their email addresses
Password Reset: Let users recover forgotten passwords
Google Sign-In: Add social login options
Profile Updates: Allow display name and photo changes
Start with email/password (what we covered), then add these features as needed.
Related Deadloq Tutorials
Firebase Series:
- Why Firebase Is Popular in Flutter Apps – Understanding Firebase benefits
- How to Set Up Firebase in Flutter – Complete Firebase configuration
- Cloud Firestore Basics – Store user data
Flutter Fundamentals:
- Flutter Introduction and Core Concepts – Flutter basics
- State Management with Provider – Managing user state
- Flutter Navigation and Routing – Navigate based on auth status
Projects:
- Building a Flutter Calculator App – Your first project
- Flutter Best Practices – Writing better code
Final Thoughts
Firebase Authentication removes one of the hardest parts of app development. With just a few lines of code, you get a secure, scalable login system that would take weeks to build from scratch.
When I first tried building authentication manually, I spent two weeks on password hashing and session management without even getting password reset working. When I switched to Firebase Authentication, I had a complete system—registration, login, logout, persistent sessions—working in an afternoon.
For Flutter developers learning to build real-world apps, Firebase Authentication is a core skill. It’s mentioned in nearly every Flutter job posting and used in countless production apps.
The code examples in this tutorial form the foundation of production authentication systems. As you build more projects, you’ll add error handling, loading states, and better UX—but the core concepts remain the same.
Authentication is no longer the scary, complex feature it once was. With Firebase and Flutter, it’s become one of the easier parts of app development.
Quick Reference
Enable in Console: Authentication → Sign-in method → Enable Email/Password
Add Package: firebase_auth: ^latest (check pub.dev)
Import: import 'package:firebase_auth/firebase_auth.dart';
Sign Up: await _auth.createUserWithEmailAndPassword(email: email, password: password);
Sign In: await _auth.signInWithEmailAndPassword(email: email, password: password);
Current User: User? user = _auth.currentUser;
Sign Out: await _auth.signOut();
Auth State: _auth.authStateChanges().listen((User? user) { });