When I first needed to build an e-commerce app prototype, I spent three days stuck on one problem: how to navigate from a product list to a product detail page and pass the product data. I tried everything—global variables, setState across widgets, even rebuilding the entire screen. Nothing worked until I finally understood how Flutter’s navigation system actually works.
In any mobile app, moving between screens is fundamental. Tap a product, see its details. Tap settings, configure your preferences. This movement between screens is navigation, and the system that manages these screens is routing.
Flutter gives you multiple ways to handle navigation and routing, from simple push/pop operations to complex declarative routing systems. This guide covers everything—from beginner basics to production-ready solutions.
What is Navigation and Routing in Flutter?
Navigation: The process of moving between different screens (widgets) in your app.
Routing: The mechanism of defining, managing, and handling screen transitions.
Think of navigation as the action (moving between pages) and routing as the system (how those pages are organized and accessed).
According to the Flutter documentation, most apps contain several screens for displaying different types of content. For example, an app might have a screen that displays products, and when the user taps an image, it displays a new screen with details about the product.
Quick Decision Guide
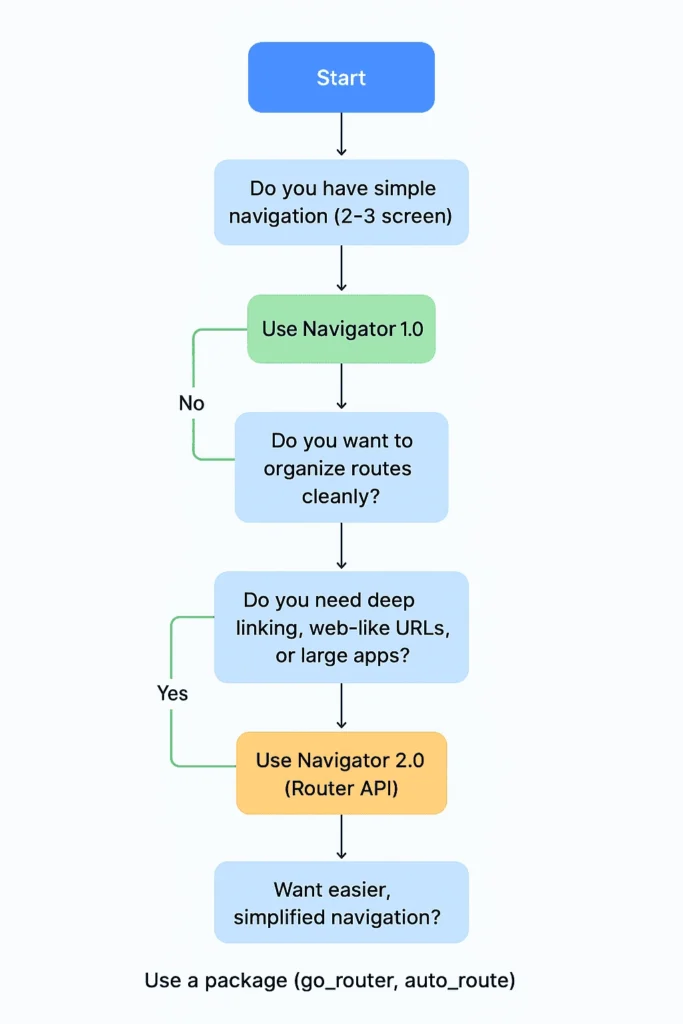
Not sure which approach to use? Here’s what I recommend based on your project:
Starting a simple app? Use Navigator 1.0 (basic push/pop). Perfect for learning and small projects.
Building a medium-sized mobile app? Use Named Routes. Keeps your code organized as the app grows.
Need web support or deep linking? Use go_router. It’s what the Flutter team recommends now.
Working on a complex enterprise app? Consider Navigator 2.0 or auto_route for full control.
I started with Navigator 1.0, moved to Named Routes for my second app, and now use go_router for anything that might need web support. Follow that progression and you’ll understand why each approach exists.
Understanding the Navigation Stack
Flutter uses a stack-based navigation model. The current screen sits on top of the stack, and when a new screen is pushed, it sits above the previous one. When popped, the screen is removed from the stack.
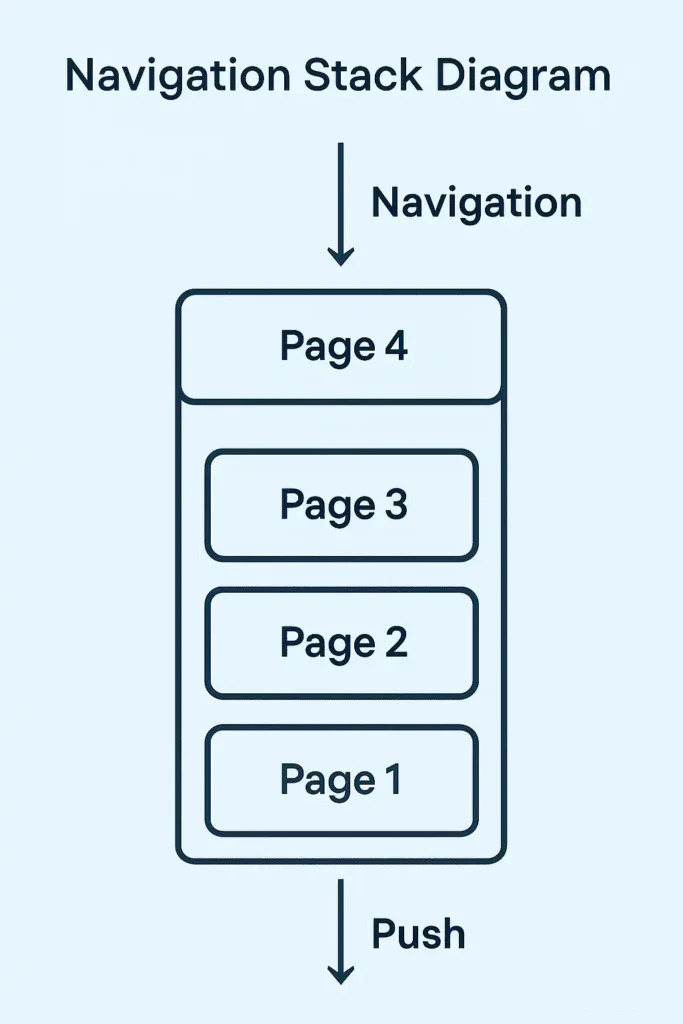
This is similar to how web browsers handle page history, but with one key difference—Flutter keeps all previous screens in memory with their complete state preserved.
The stack concept confused me at first. Why not just swap screens? The reason is brilliant—when you go back, your scroll position, form inputs, everything stays exactly as you left it. This creates a much better user experience.
For a deeper understanding of Flutter’s widget system and how screens are built, check out the official Flutter documentation.
Navigator 1.0 (Imperative Navigation)
Navigator 1.0 is Flutter’s classic navigation approach. It’s straightforward, intuitive, and works perfectly for simple applications. This is where everyone should start.
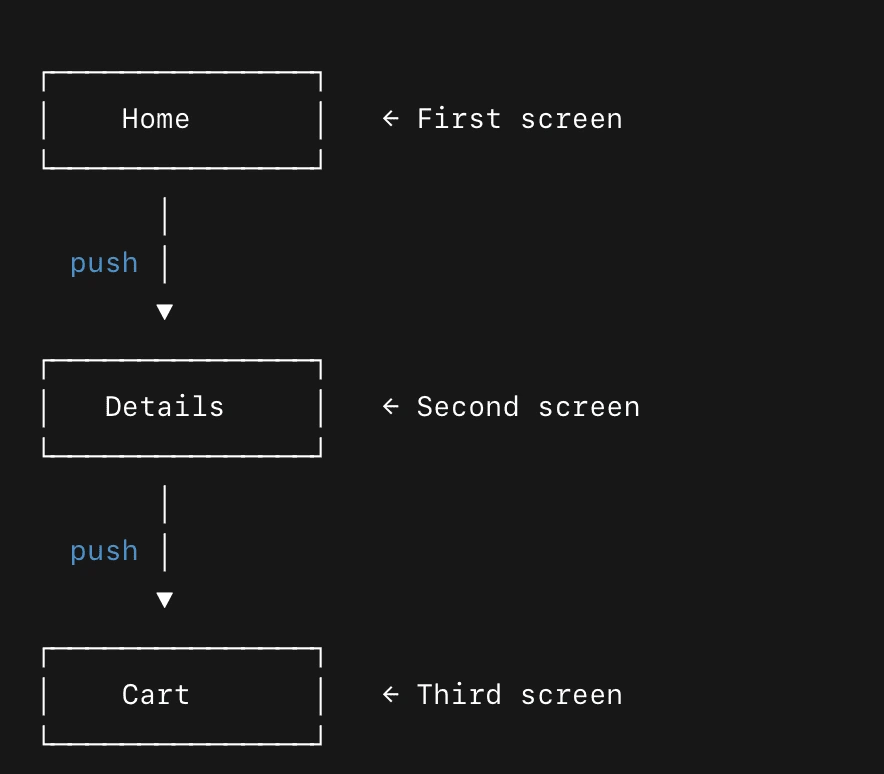
Basic Push and Pop Navigation
// Navigate to another screen
Navigator.push(
  context,
  MaterialPageRoute(builder: (context) => SecondScreen()),
);

// Go back to previous screen
Navigator.pop(context);
Simple, right? This is imperative navigation—you tell Flutter exactly what to do and when to do it.
Passing Data Forward
You can pass data when navigating to a new screen:
Navigator.push(
  context,
  MaterialPageRoute(
    builder: (context) => ProductDetailScreen(productId: '123'),
  ),
);
The ProductDetailScreen receives the data through its constructor:
class ProductDetailScreen extends StatelessWidget {
  final String productId;

  ProductDetailScreen({required this.productId});

  @override
  Widget build(BuildContext context) {
    return Scaffold(
      appBar: AppBar(title: Text('Product $productId')),
      body: Center(child: Text('Details for product $productId')),
    );
  }
}
This is type-safe and clean. The compiler catches mistakes, which saved me countless debugging hours.
Receiving Data Back
You can also receive data when returning from a screen:
// Navigate and wait for result
final result = await Navigator.push(
  context,
  MaterialPageRoute(builder: (context) => EditScreen()),
);

if (result != null) {
  print('Received: $result');
}
In the EditScreen, return data when the user presses save:
ElevatedButton(
  onPressed: () {
    Navigator.pop(context, 'Updated data');
  },
  child: Text('Save'),
)
I use this pattern constantly for edit screens, forms, and any situation where I need feedback from a secondary screen.
Navigator 1.0: Pros and Cons
Pros:
- Simple and quick to implement
- Great for small apps and learning
- Direct and intuitive
- Minimal learning curve
- No setup required
Cons:
- Hard to manage in large apps
- Routes scattered across multiple files
- No URL support for web applications
- Difficult to implement deep linking
- Testing can be tricky
Navigator 1.0 is perfect for your first 2-3 Flutter apps. Use it, understand it, then graduate to more advanced solutions when you hit its limitations.
Named Routes in Flutter
After building a few screens with Navigator 1.0, I realized my code was getting messy. I had MaterialPageRoute(builder: (context) => SomeScreen()) scattered everywhere. Named routes solved this by centralizing navigation logic.
Setting Up Named Routes
Define all your routes in one place:
void main() {
  runApp(MaterialApp(
    initialRoute: '/',
    routes: {
      '/': (context) => HomeScreen(),
      '/second': (context) => SecondScreen(),
      '/profile': (context) => ProfileScreen(),
      '/settings': (context) => SettingsScreen(),
    },
    onUnknownRoute: (settings) => MaterialPageRoute(
      builder: (context) => NotFoundScreen(),
    ),
  ));
}
Now all your routes are visible in one place. This makes understanding your app’s structure much easier.
Navigating Between Named Routes
Navigation becomes cleaner:
// Navigate to named route
Navigator.pushNamed(context, '/second');

// Navigate with arguments
Navigator.pushNamed(
  context,
  '/profile',
  arguments: {'userId': '123'},
);
Much better than writing MaterialPageRoute every time.
Handling Arguments in Named Routes
Receive and process arguments in your destination screens:
class ProfileScreen extends StatelessWidget {
  @override
  Widget build(BuildContext context) {
    final args = ModalRoute.of(context)?.settings.arguments as Map<String, dynamic>?;
    final userId = args?['userId'] ?? 'Unknown';

    return Scaffold(
      appBar: AppBar(title: Text('Profile: $userId')),
      body: Center(child: Text('User ID: $userId')),
    );
  }
}
The downside? This isn’t type-safe. You have to cast arguments manually, which can cause runtime errors. I’ve debugged way too many “type ‘String’ is not a subtype of type ‘int'” errors because of this.
Best Practice: Route Constants
Create a constants file for your routes:
class Routes {
  static const String home = '/';
  static const String profile = '/profile';
  static const String settings = '/settings';
  static const String productDetail = '/product-detail';
}

// Usage
Navigator.pushNamed(context, Routes.profile);
This prevents typos and makes refactoring easier. Trust me, you’ll thank yourself later when you need to rename a route.
Named Routes: Pros and Cons
Pros:
- Cleaner and more organized
- Easier to manage as app grows
- Centralized route definitions
- Better for testing
- All routes visible in one place
Cons:
- Still imperative approach
- Limited flexibility for advanced cases
- Arguments are not type-safe
- No built-in deep linking support
- Flutter team now recommends against this for new apps
Important: The Flutter team now advises against using named routes for most applications. Named routes can handle deep links, but the behavior is always the same and can’t be customized. Flutter also doesn’t support the browser forward button for applications using named routes. They recommend using go_router instead.
I still use named routes for simple mobile-only apps where I don’t need web support. But for new projects, I skip straight to go_router.
Navigator 2.0 (Declarative Navigation)
As Flutter apps became larger and more complex, Navigator 1.0 and Named Routes showed their limitations. Navigator 2.0 was introduced to handle:
- Web apps with URL-based navigation
- Deep linking (opening specific screens from external links)
- Nested navigation (apps with multiple navigation stacks)
- Browser back button support
- SEO-friendly routing
Fair warning: Navigator 2.0 is verbose and complex. Most developers (including me) use routing packages instead. But understanding Navigator 2.0 helps you appreciate why those packages exist.
Navigator 2.0 Core Components
Navigator 2.0 has three main parts that work together:
- RoutePath: Defines your app’s route structure
- RouteInformationParser: Converts URLs to route objects
- RouterDelegate: Manages navigation state and builds screens
Let me show you how these work together.
Step 1: Understanding RoutePath
Define your app’s route structure:
class RoutePath {
  final String location;
  final bool isUnknown;

  RoutePath.home() : location = '/', isUnknown = false;
  RoutePath.second() : location = '/second', isUnknown = false;
  RoutePath.unknown() : location = '/404', isUnknown = true;

  bool get isHome => location == '/';
  bool get isSecond => location == '/second';
}
This represents your app’s possible routes as objects instead of strings.
Step 2: Creating the Route Parser
Implement the RouteInformationParser to handle URL parsing:
class MyRouteInformationParser extends RouteInformationParser<RoutePath> {
  @override
  Future<RoutePath> parseRouteInformation(RouteInformation routeInformation) async {
    final uri = Uri.parse(routeInformation.location ?? '/');

    if (uri.pathSegments.isEmpty) {
      return RoutePath.home();
    }

    if (uri.pathSegments.length == 1) {
      switch (uri.pathSegments[0]) {
        case 'second':
          return RoutePath.second();
        default:
          return RoutePath.unknown();
      }
    }

    return RoutePath.unknown();
  }

  @override
  RouteInformation? restoreRouteInformation(RoutePath path) {
    return RouteInformation(location: path.location);
  }
}
This converts URLs like /second into RoutePath objects your app understands.
Step 3: Implementing the Router Delegate
Create the RouterDelegate to manage navigation state:
class MyRouterDelegate extends RouterDelegate<RoutePath>
    with ChangeNotifier, PopNavigatorRouterDelegateMixin<RoutePath> {

  final GlobalKey<NavigatorState> navigatorKey = GlobalKey<NavigatorState>();
  RoutePath _currentPath = RoutePath.home();

  @override
  Widget build(BuildContext context) {
    return Navigator(
      key: navigatorKey,
      pages: [
        MaterialPage(
          key: ValueKey('home'),
          child: HomeScreen(onNavigateToSecond: _handleNavigateToSecond),
        ),
        if (_currentPath.isSecond)
          MaterialPage(
            key: ValueKey('second'),
            child: SecondScreen(),
          ),
        if (_currentPath.isUnknown)
          MaterialPage(
            key: ValueKey('unknown'),
            child: NotFoundScreen(),
          ),
      ],
      onPopPage: (route, result) {
        if (!route.didPop(result)) return false;

        if (_currentPath.isSecond) {
          _currentPath = RoutePath.home();
          notifyListeners();
        }

        return true;
      },
    );
  }

  void _handleNavigateToSecond() {
    _currentPath = RoutePath.second();
    notifyListeners();
  }

  @override
  Future<void> setNewRoutePath(RoutePath path) async {
    _currentPath = path;
  }
}
This is where the magic happens—it decides which pages to show based on the current route.
Step 4: Wiring Everything Together
Connect all components in your main app:
void main() {
  runApp(MyApp());
}

class MyApp extends StatelessWidget {
  final MyRouterDelegate _routerDelegate = MyRouterDelegate();
  final MyRouteInformationParser _routeInformationParser = MyRouteInformationParser();

  @override
  Widget build(BuildContext context) {
    return MaterialApp.router(
      routerDelegate: _routerDelegate,
      routeInformationParser: _routeInformationParser,
    );
  }
}
Yeah, it’s a lot of code. When I first saw Navigator 2.0, I thought “why would anyone use this?” But then I needed to build a web app with proper URLs, and suddenly it all made sense.
Navigator 2.0: Pros and Cons
Pros:
- Declarative and scalable
- Supports web URLs and deep linking
- Browser back/forward button support
- Flexible for complex apps
- Better state management
- SEO-friendly for web apps
- Full control over navigation behavior
Cons:
- Verbose and complex to implement
- Steep learning curve
- Significant boilerplate code
- Overkill for simple apps
- Harder to debug than Navigator 1.0
I’ve never used raw Navigator 2.0 in production. The complexity isn’t worth it when packages like go_router give you the same benefits with 90% less code.
Modern Routing Packages
This is where Flutter navigation gets practical. Routing packages give you Navigator 2.0’s power with Navigator 1.0’s simplicity.
go_router (Recommended)
The Flutter team’s officially recommended routing package. I use this for all new projects now.
final router = GoRouter(
  routes: [
    GoRoute(
      path: '/',
      builder: (context, state) => HomeScreen(),
    ),
    GoRoute(
      path: '/product/:id',
      builder: (context, state) => ProductScreen(
        productId: state.pathParameters['id']!,
      ),
    ),
  ],
);

// In MaterialApp
MaterialApp.router(
  routerConfig: router,
)

// Navigate
context.go('/product/123');
Clean, type-safe, and handles deep linking automatically. This is what Named Routes should have been.
auto_route
Generates routing code based on annotations. Less boilerplate, more magic.
@MaterialAutoRouter(
  routes: [
    AutoRoute(page: HomeScreen, initial: true),
    AutoRoute(page: ProfileScreen),
  ],
)
class $AppRouter {}

// Navigate
context.router.push(ProfileRoute());
I used auto_route on a large project and loved not writing routing boilerplate. The trade-off is understanding code generation.
beamer
Another solid declarative routing option focused on nested navigation:
final beamerDelegate = BeamerDelegate(
  locationBuilder: RoutesLocationBuilder(
    routes: {
      '/': (context, state, data) => HomeScreen(),
      '/profile': (context, state, data) => ProfileScreen(),
    },
  ),
);
I haven’t used Beamer as much, but developers working with complex nested navigation love it.
Handling Unknown Routes and Errors
Every app needs a 404 page. Here’s how to handle unknown routes in different approaches.
Error Handling in Navigator 1.0 and Named Routes
MaterialApp(
  routes: {
    '/': (context) => HomeScreen(),
    '/profile': (context) => ProfileScreen(),
  },
  onUnknownRoute: (settings) {
    return MaterialPageRoute(
      builder: (context) => NotFoundScreen(),
    );
  },
)
Error Handling in Navigator 2.0
Handle unknown routes in the RouteInformationParser:
@override
Future<RoutePath> parseRouteInformation(RouteInformation routeInformation) async {
  final uri = Uri.parse(routeInformation.location ?? '/');

  if (uri.pathSegments.isEmpty) return RoutePath.home();
  if (uri.pathSegments[0] == 'profile') return RoutePath.profile();

  // Return unknown route for unmatched paths
  return RoutePath.unknown();
}
Creating a User-Friendly 404 Screen
class NotFoundScreen extends StatelessWidget {
  @override
  Widget build(BuildContext context) {
    return Scaffold(
      appBar: AppBar(title: Text('Page Not Found')),
      body: Center(
        child: Column(
          mainAxisAlignment: MainAxisAlignment.center,
          children: [
            Icon(Icons.error_outline, size: 64, color: Colors.grey),
            SizedBox(height: 16),
            Text(
              'The page you are looking for does not exist.',
              style: TextStyle(fontSize: 16),
            ),
            SizedBox(height: 16),
            ElevatedButton(
              onPressed: () => Navigator.pushReplacementNamed(context, '/'),
              child: Text('Go Home'),
            ),
          ],
        ),
      ),
    );
  }
}
A good 404 page turns a frustrating moment into a recoverable experience.
Comparison: Choosing the Right Approach
| Feature | Navigator 1.0 | Named Routes | Navigator 2.0 | Routing Packages |
|---|---|---|---|---|
| Best for | Small apps | Medium apps | Large/complex apps | Medium to large apps |
| Style | Imperative | Imperative (centralized) | Declarative | Declarative (simplified) |
| Deep Linking | No | No | Yes | Yes |
| Web Support | Limited | Limited | Yes | Yes |
| URL Support | No | No | Yes | Yes |
| Type Safety | Yes | No | Manual | Yes (some packages) |
| Learning Curve | Low | Low | High | Medium |
| Boilerplate | Low | Low | High | Low to Medium |
| Maintenance | Hard | Medium | Medium | Easy |
My recommendation: Start with Navigator 1.0 to learn concepts, use Named Routes for your first real app, then jump to go_router for anything beyond that.
Best Practices for Navigation and Routing
After building dozens of Flutter apps, here’s what actually matters:
Route Organization
Keep route definitions organized and maintainable:
// routes.dart
class AppRoutes {
  static const String home = '/';
  static const String profile = '/profile';
  static const String settings = '/settings';
  static const String productDetail = '/product/:id';
}
I create a separate routes file in every project now. It’s one of those things that seems unnecessary until you’re hunting for a typo at 2 AM.
Performance Considerations
Use pushReplacement instead of push when users shouldn’t return. Keeps the navigation stack cleaner and uses less memory.
Consider lazy loading for heavy screens. Don’t load resources until the screen is actually displayed.
Use pushAndRemoveUntil for authentication flows. Clears the stack completely so users can’t accidentally navigate back to login screens.
Testing Navigation
Always test your navigation logic:
testWidgets('should navigate to profile screen', (tester) async {
  await tester.pumpWidget(MyApp());

  await tester.tap(find.byKey(Key('profile_button')));
  await tester.pumpAndSettle();

  expect(find.byType(ProfileScreen), findsOneWidget);
});
Navigation bugs are some of the worst user experiences. Test thoroughly.
Frequently Asked Questions
Q: What’s the difference between push and pushReplacement?
Navigator.push() adds a new screen on top of the current one, allowing users to go back. Navigator.pushReplacement() replaces the current screen, removing it from the stack so users can’t return to it.
Use pushReplacement() for login flows or when you don’t want users navigating back.
// User can go back
Navigator.push(context, MaterialPageRoute(builder: (context) => NewScreen()));

// User cannot go back
Navigator.pushReplacement(context, MaterialPageRoute(builder: (context) => NewScreen()));
Q: How do I pass data between screens in Navigator 1.0?
Pass data through the constructor when navigating:
Navigator.push(
  context,
  MaterialPageRoute(
    builder: (context) => DetailScreen(productId: 'ABC123'),
  ),
);
Return data using Navigator.pop():
Navigator.pop(context, {'result': 'success', 'data': updatedData});
Q: Should I use Navigator 2.0 or a routing package?
Use a routing package like go_router. Raw Navigator 2.0 requires significant boilerplate. Routing packages provide Navigator 2.0’s benefits with much simpler implementation.
I’ve never seen a good reason to use raw Navigator 2.0 in production.
Q: How do I handle the Android back button?
Use PopScope (Flutter 3.12+) to intercept back button presses:
PopScope(
  canPop: false,
  onPopInvoked: (didPop) {
    if (!didPop) {
      showDialog(
        context: context,
        builder: (context) => AlertDialog(
          title: Text('Exit App?'),
          content: Text('Are you sure you want to exit?'),
          actions: [
            TextButton(
              onPressed: () => Navigator.of(context).pop(),
              child: Text('Cancel'),
            ),
            TextButton(
              onPressed: () => SystemNavigator.pop(),
              child: Text('Exit'),
            ),
          ],
        ),
      );
    }
  },
  child: YourScreen(),
)
Q: How do I implement deep linking in Flutter?
Deep linking is easiest with routing packages. With go_router:
final router = GoRouter(
  routes: [
    GoRoute(
      path: '/',
      builder: (context, state) => HomeScreen(),
    ),
    GoRoute(
      path: '/product/:id',
      builder: (context, state) => ProductScreen(
        productId: state.pathParameters['id']!,
      ),
    ),
  ],
);

// This URL will automatically navigate to ProductScreen
// myapp://product/123 or https://myapp.com/product/123
Q: How do I navigate without BuildContext?
Use a global navigator key. Use this sparingly as it makes testing harder:
// Define global key
final GlobalKey<NavigatorState> navigatorKey = GlobalKey<NavigatorState>();

// In MaterialApp
MaterialApp(
  navigatorKey: navigatorKey,
)

// Navigate from anywhere
navigatorKey.currentState?.pushNamed('/login');
I only use this for showing error dialogs from services that don’t have access to BuildContext.
Q: What’s the best way to handle nested navigation?
Use packages like go_router with shell routes:
final router = GoRouter(
  routes: [
    ShellRoute(
      builder: (context, state, child) => BottomNavScaffold(child: child),
      routes: [
        GoRoute(path: '/home', builder: (context, state) => HomeScreen()),
        GoRoute(path: '/profile', builder: (context, state) => ProfileScreen()),
      ],
    ),
  ],
);
Q: How do I prevent users from going back to the login screen after authentication?
Use pushAndRemoveUntil() to clear the navigation stack:
Navigator.pushAndRemoveUntil(
  context,
  MaterialPageRoute(builder: (context) => HomeScreen()),
  (route) => false, // Remove all previous routes
);
Q: Can I animate transitions between screens?
Yes, create custom PageRouteBuilder:
Navigator.push(
  context,
  PageRouteBuilder(
    pageBuilder: (context, animation, secondaryAnimation) => NewScreen(),
    transitionsBuilder: (context, animation, secondaryAnimation, child) {
      return SlideTransition(
        position: animation.drive(
          Tween(begin: Offset(1.0, 0.0), end: Offset.zero),
        ),
        child: child,
      );
    },
  ),
);
Q: How do I test navigation in Flutter?
Use flutter_test and mock navigation:
testWidgets('should navigate to detail screen', (tester) async {
  await tester.pumpWidget(MyApp());

  await tester.tap(find.byKey(Key('detail_button')));
  await tester.pumpAndSettle();

  expect(find.byType(DetailScreen), findsOneWidget);
});
Conclusion
Navigation and routing are fundamental to building interactive Flutter applications. The choice between different approaches depends on your app’s complexity:
Navigator 1.0: Perfect for small, simple apps with basic navigation needs. Start here to learn the fundamentals.
Named Routes: Good for medium-sized apps that need organized, centralized routing. Still viable for mobile-only apps.
Navigator 2.0: Powerful for large apps requiring deep linking, web support, and complex navigation patterns. Too verbose for most projects.
Routing Packages: Best balance of power and simplicity for most modern Flutter applications. Use go_router for new projects.
For new projects, I recommend starting with go_router. It provides Navigator 2.0’s benefits with much less complexity. For existing projects, evaluate your current needs and migration effort before switching approaches.
Remember that good navigation enhances user experience, while poor navigation can make even the best app feel clunky. Choose the approach that best fits your project’s needs and your team’s expertise.
The Flutter ecosystem keeps evolving. Named routes were the standard, then Navigator 2.0 arrived, now routing packages dominate. Stay flexible and choose the tool that makes your development experience better.
For more information on Flutter navigation, visit the official Flutter navigation documentation and explore the Flutter cookbook for practical examples.
Related Articles:
- Navigation and Routing in Flutter: Complete Guide to Moving Between Screens (beginner series)
- Flutter Best Practices
- State Management with Provider
- Cross-Platform Development with Flutter
- Beginner Flutter Projects
Still confused about navigation and routing? Drop a comment below. I’m happy to help.