After understanding why Firebase is popular in Flutter apps, the next step is actually connecting it to your project. The process may look long at first, but once you’ve done it once, it becomes straightforward.
I remember my first Firebase setup—I made every mistake possible. Wrong package names, files in wrong folders, forgot to initialize Firebase. It took me three hours. Now I can do it in 15 minutes. This guide will save you from making those same mistakes.
This tutorial walks you through the complete setup process step by step, focusing on clarity and avoiding common pitfalls.
Tip: Do the Firebase setup at the beginning of your project, not halfway through. It’s much easier to configure Firebase with a fresh project than to add it to existing code. Trust me, I learned this the hard way.
What You’ll Need Before Starting
Before beginning the Firebase setup, make sure you have:
Flutter installed and working – Run flutter doctor to verify. If you need help, see our Installing Flutter on Windows guide.
A Google account – You’ll need this to access the Firebase Console.
VS Code or Android Studio – With Flutter extensions installed. Check Creating Flutter Projects in VS Code if needed.
Basic understanding of Flutter project structure – Know where files like pubspec.yaml and main.dart are located.
15-20 minutes of focused time – Don’t rush through this. Each step matters.
Overview: What We’re Going to Do
Here’s the complete process at a glance:
- Create a Firebase project in the Firebase Console
- Create or open your Flutter project
- Add your Flutter app to Firebase (Android and/or iOS)
- Download and place configuration files
- Add Firebase packages to your Flutter project
- Configure platform-specific files
- Initialize Firebase in your Flutter code
- Test the setup
Let’s start.
Step 1: Create a Firebase Project
Firebase projects are created through the Firebase Console, which is Google’s web interface for managing Firebase.
1.1 Access Firebase Console
Go to the Firebase Console
Sign in with your Google account if prompted.
1.2 Create New Project
- Click the Add project button (or Create a project if this is your first)
- You’ll be guided through a 3-step process

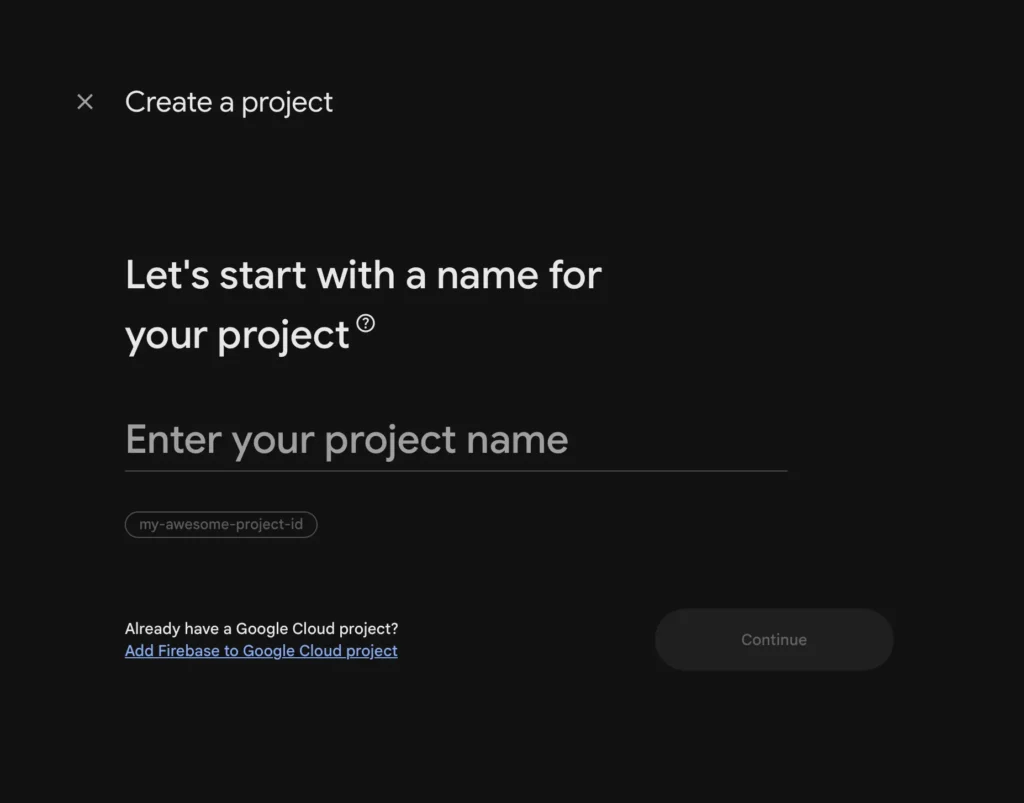
1.3 Name Your Project
Step 1 of 3: Project name
Enter a project name. This can be anything descriptive like:
my_app_firebaseflutter_demopractice_app_backend
The name is just for your reference. It doesn’t affect your app’s functionality.
Click Continue
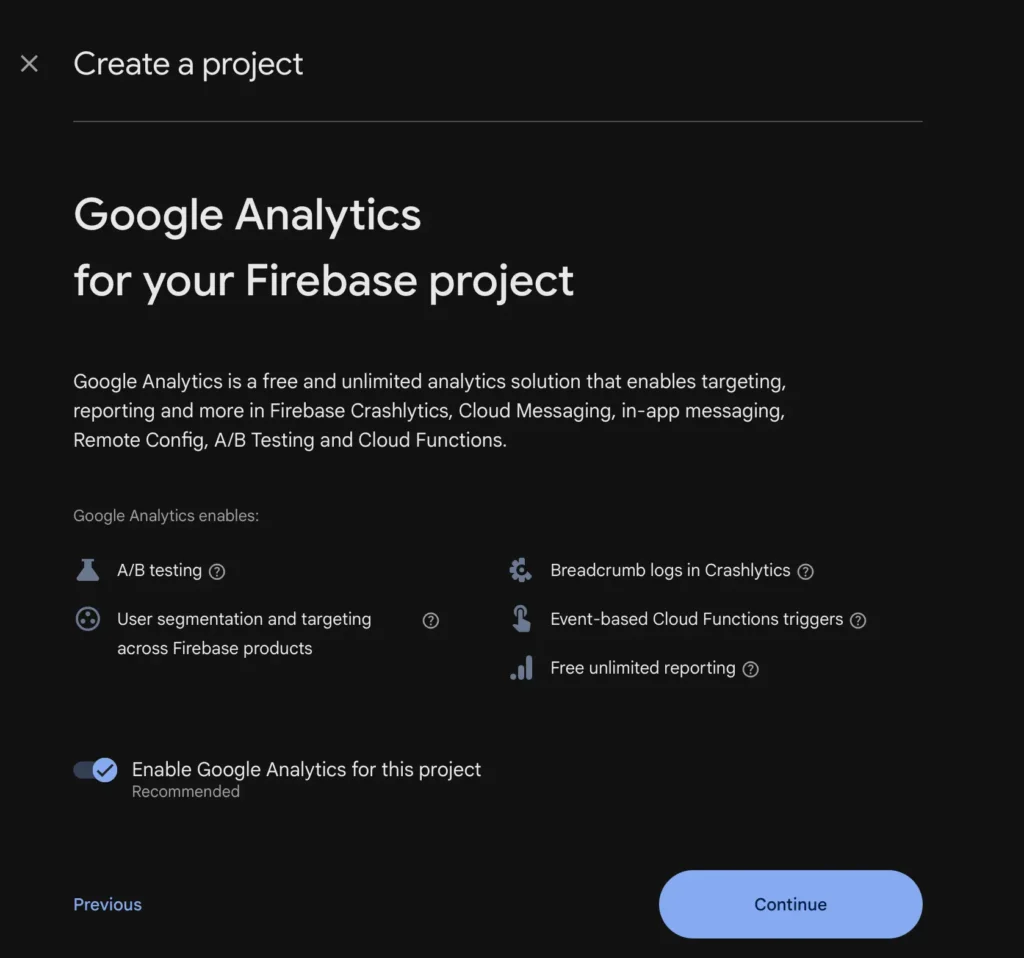
1.4 Configure Google Analytics (Optional)
Step 2 of 3: Google Analytics
Firebase will ask if you want to enable Google Analytics.
For learning and practice projects, you can:
- Toggle it OFF to simplify setup
- Leave it ON if you want usage tracking (you can add it later)
Click Continue
1.5 Create the Project
Step 3 of 3: Confirm
If you enabled Analytics, select an Analytics account or create one.
Click Create project
Firebase will take 30-60 seconds to set up your project.
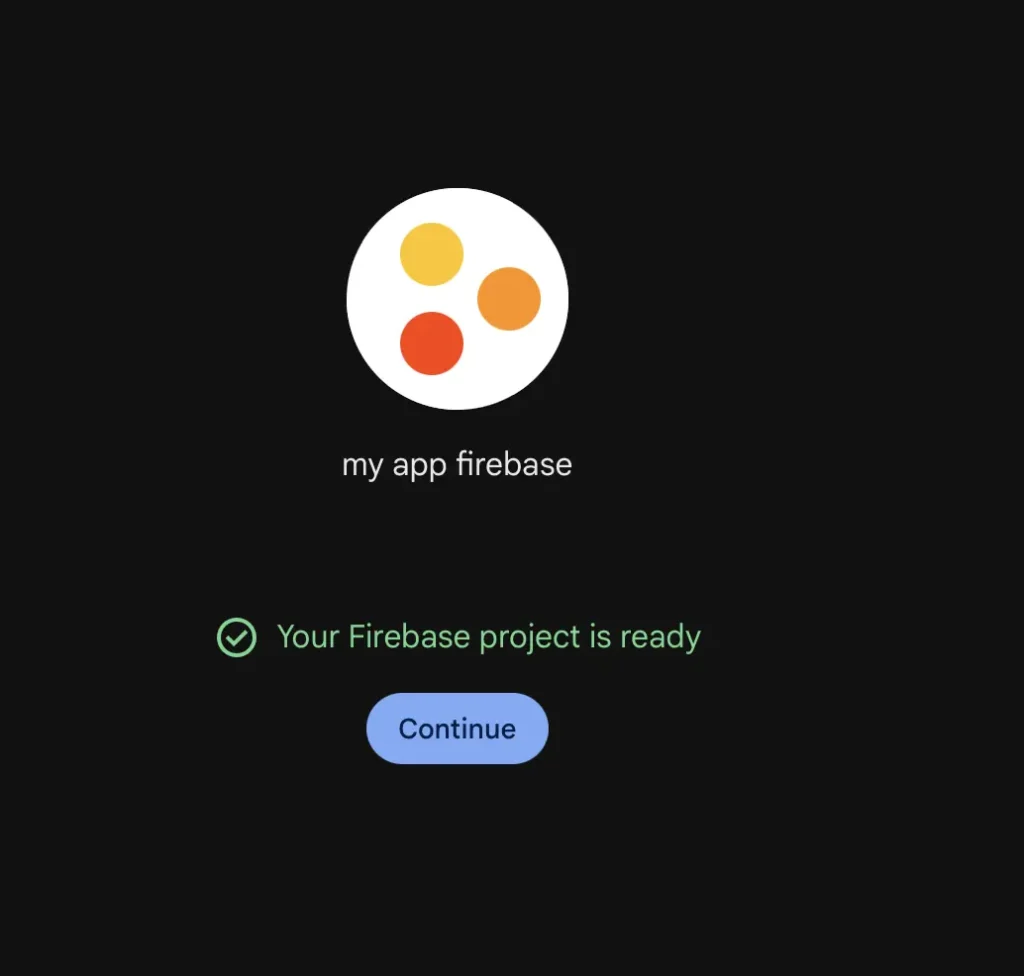
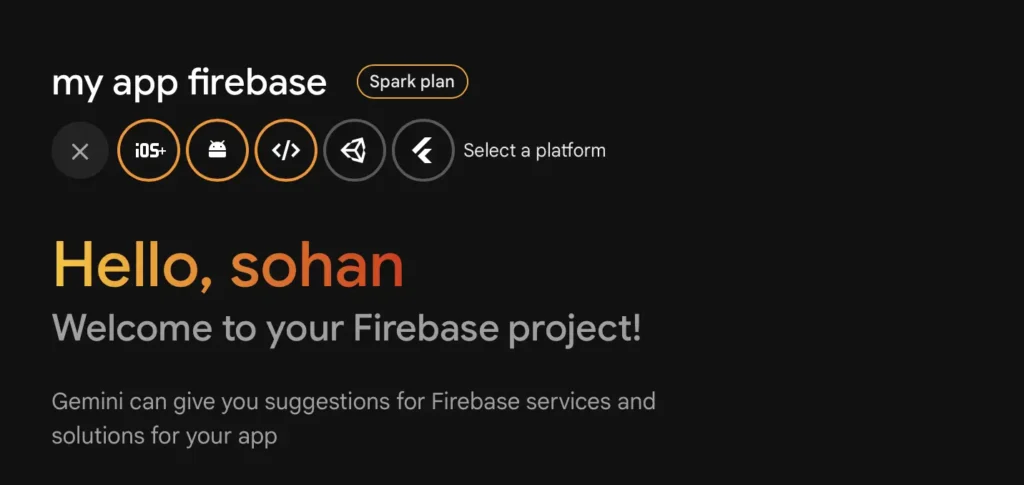
1.6 Access Your Project Dashboard
Once created, click Continue to enter your project dashboard.
This is your Firebase home base. You’ll return here to manage all Firebase services.
Step 2: Create a Flutter Project (If You Don’t Have One)
If you already have a Flutter project you want to add Firebase to, skip to Step 3.
If you’re starting fresh, create a new Flutter project:
2.1 Open Terminal or Command Prompt
Navigate to where you want to create the project:
cd Desktop # or wherever you keep projects
2.2 Create the Project
flutter create firebase_demo
Replace firebase_demo with your preferred project name.
This creates a new Flutter project with default template code.
2.3 Open the Project
cd firebase_demo
code .  # Opens VS Code
Or open it manually in VS Code or Android Studio.
For more details on Flutter project creation, see our Flutter Introduction and Core Concepts guide.
Step 3: Add Your Flutter App to Firebase
Now you need to register your Flutter app with Firebase. Firebase needs to know which specific app it’s connecting to.
You’ll do this separately for Android and iOS.
3.1 Add Android App to Firebase
Step 3.1.1: Start Android App Registration
In your Firebase Console project dashboard:
- Click the Android icon (or click Add app → Android)
Step 3.1.2: Find Your Android Package Name
Firebase needs your app’s package name (also called application ID).
Open this file in your Flutter project:
android/app/build.gradle
Look for this line (around line 5-10):
applicationId "com.example.firebase_demo"
Copy this package name. In this example: com.example.firebase_demo
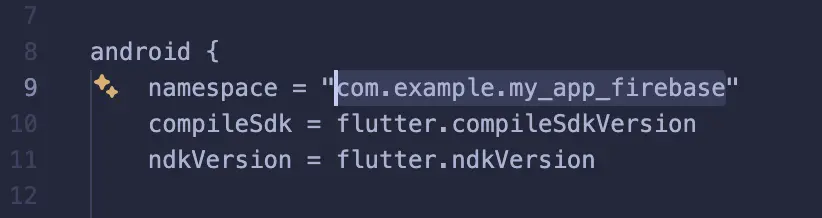
Important: This package name uniquely identifies your app. Make sure you copy it exactly.
Step 3.1.3: Register the App
Back in Firebase Console:
- Paste your package name into the Android package name field
- App nickname (optional): Enter something like “Flutter Android”
- Debug signing certificate (optional): Skip for now
- Click Register app
Step 3.1.4: Download Configuration File
Firebase will provide a google-services.json file.
- Click Download google-services.json
- Save it to your computer
Step 3.1.5: Place Configuration File in Your Project
This is critical—get the location exactly right:
- Open your Flutter project folder
- Navigate to:
android/app/ - Place
google-services.jsondirectly inside theappfolder
The file structure should look like:
your_project/
├── android/
│   ├── app/
│   │   ├── google-services.json  ← HERE
│   │   ├── build.gradle
│   │   └── src/
│   └── build.gradle
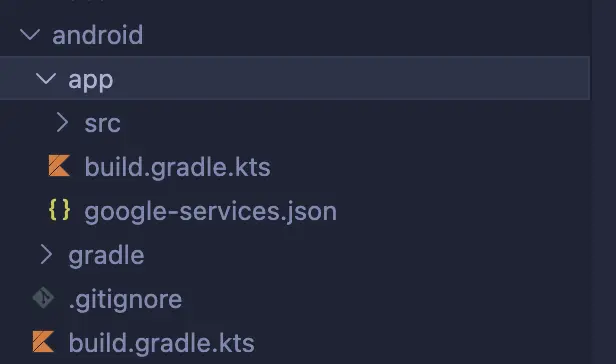
Common mistake: Putting it in android/ instead of android/app/. This won’t work.
Click Next in Firebase Console, then Continue to console.
3.2 Add iOS App to Firebase (Optional)
If you’re only building for Android, you can skip this section. You can always add iOS later.
Step 3.2.1: Start iOS App Registration
In Firebase Console:
- Click Add app → iOS
Step 3.2.2: Find Your iOS Bundle ID
Open this file:
ios/Runner.xcodeproj/project.pbxproj
Search for PRODUCT_BUNDLE_IDENTIFIER. You’ll find lines like:
PRODUCT_BUNDLE_IDENTIFIER = com.example.firebaseDemo;
Copy this bundle ID.
Alternative method (easier):
- Open Xcode
- Open
ios/Runner.xcworkspace - Click on Runner in the left panel
- Find Bundle Identifier under the General tab
Step 3.2.3: Register iOS App
- Paste the bundle ID into Firebase
- Add an optional app nickname
- Click Register app
Step3.2.4: Download iOS Configuration File
- Download
GoogleService-Info.plist - Save it to your computer
Step 3.2.5: Place iOS Configuration File
Using Xcode (recommended method):
- Open
ios/Runner.xcworkspacein Xcode (not the.xcodeprojfile) - Right-click on Runner in the left panel
- Select Add Files to “Runner”…
- Select the downloaded
GoogleService-Info.plist - Make sure Copy items if needed is checked
- Make sure Runner target is selected
- Click Add
Click Next in Firebase Console, then Continue to console.
Step 4: Add Firebase Packages to Your Flutter App
Now you need to add Firebase code packages to your Flutter project.
4.1 Open pubspec.yaml
In your Flutter project, open the pubspec.yaml file.
4.2 Add firebase_core Package
Find the dependencies: section and add firebase_core:
dependencies:
  flutter:
    sdk: flutter
  firebase_core: ^2.24.2
Note: This guide uses firebase_core version 2.24.2, which was current when written. Always check pub.dev/packages/firebase_core for the most recent version. The version number might be higher in 2026, but the setup logic remains exactly the same.
Important: Use the latest version from pub.dev/packages/firebase_core.
The firebase_core package is required for all Firebase functionality. Every Firebase feature depends on this package.
Version note: Package versions change frequently. While this guide shows specific version numbers, always check pub.dev for the latest stable version. The setup process remains the same regardless of version number.
4.3 Install the Package
Save the file, then run in terminal:
flutter pub get
This downloads the Firebase packages and makes them available to your app.
You should see output like:
Running "flutter pub get" in firebase_demo...
Resolving dependencies...
+ firebase_core 2.24.2
+ firebase_core_platform_interface 5.0.0
...
Changed X dependencies!
Step 5: Configure Platform-Specific Files
Firebase requires some additional configuration in Android and iOS build files.
5.1 Android Configuration
Step 5.1.1: Configure Project-Level build.gradle
Open this file:
android/build.gradle
Find the dependencies block inside buildscript. It looks like:
buildscript {
    dependencies {
        classpath 'com.android.tools.build:gradle:7.3.0'
        classpath "org.jetbrains.kotlin:kotlin-gradle-plugin:$kotlin_version"
    }
}
Add this line inside the dependencies block:
classpath 'com.google.gms:google-services:4.4.0'
Version note: This guide uses version 4.4.0. Check Google Services Plugin releases for the latest version, though the configuration process remains identical across versions.
The complete section should look like:
buildscript {
    dependencies {
        classpath 'com.android.tools.build:gradle:7.3.0'
        classpath "org.jetbrains.kotlin:kotlin-gradle-plugin:$kotlin_version"
        classpath 'com.google.gms:google-services:4.4.0'  // Add this line
    }
}
Note: Check for the latest version at Google Services Plugin, but the configuration steps remain the same.
Step 5.1.2: Configure App-Level build.gradle
Open this file:
android/app/build.gradle
Scroll to the very bottom of the file and add this line:
apply plugin: 'com.google.gms.google-services'
Make sure it’s the last line in the file.
This plugin processes the google-services.json file you added earlier.
5.2 iOS Configuration
Step 5.2.1: Install CocoaPods Dependencies
iOS apps use CocoaPods for dependency management. Run these commands:
cd ios
pod install
cd ..
This installs all iOS Firebase dependencies.
You should see output like:
Analyzing dependencies
Downloading dependencies
Installing Firebase (10.x.x)
Installing FirebaseCore (10.x.x)
...
Pod installation complete!
Step 5.2.2: Set iOS Deployment Target
Firebase requires iOS 11.0 or higher.
Open ios/Podfile and look for:
platform :ios, '11.0'
If it shows a lower version, change it to at least 11.0.
After changing, run pod install again from the ios directory.
The Pro Shortcut: FlutterFire CLI (Optional)
Before we move to Step 6, I want to mention there’s actually a faster way to do Steps 3-5: the FlutterFire CLI.
What Is FlutterFire CLI?
FlutterFire CLI is an official command-line tool from Google that automates most of the Firebase setup process. It was introduced to simplify Firebase configuration for Flutter developers.
Instead of manually:
- Downloading configuration files
- Placing them in correct locations
- Modifying build.gradle files
- Running pod install
The CLI does it all automatically with one command.
Why Learn the Manual Way First?
If there’s an automated tool, why did I just walk you through 30 minutes of manual setup?
Understanding matters: When something breaks (and it will), knowing what’s happening behind the scenes helps you fix it.
Not always available: Some development environments or CI/CD pipelines require manual setup.
Better debugging: Understanding the manual process makes troubleshooting CLI-generated configs much easier.
Interview questions: If you’re applying for Flutter jobs, interviewers often ask about Firebase setup details.
I learned Firebase setup manually first, and I’m glad I did. When the CLI had issues on one project, I knew exactly how to fix it because I understood the underlying structure.
How to Use FlutterFire CLI (Quick Overview)
If you want to try the automated approach for your next project:
1. Install the CLI:
dart pub global activate flutterfire_cli
2. Configure Firebase:
flutterfire configure
This command:
- Connects to your Firebase project
- Generates configuration files
- Places them in correct locations
- Updates platform-specific files
- Creates a
firebase_options.dartfile with all settings
3. Initialize in your app:
import 'firebase_options.dart';

await Firebase.initializeApp(
  options: DefaultFirebaseOptions.currentPlatform,
);
That’s it. The entire Steps 3-5 done in 2 minutes.
When to Use Each Method
Use Manual Setup When:
- Learning Firebase for the first time
- Need to understand the architecture
- Working with legacy projects
- Debugging configuration issues
- Have specific custom requirements
Use FlutterFire CLI When:
- You understand the fundamentals
- Starting new projects quickly
- Working with multiple Firebase projects
- Need consistent configuration across teams
- Want to save time on repetitive setup
My Recommendation
For your first 2-3 Firebase projects, use the manual method I’ve shown in this guide. Once you’re comfortable and understand what’s happening, switch to FlutterFire CLI for speed.
That’s what I do now: manual setup when learning or debugging, CLI for production projects where I need speed.
For a complete FlutterFire CLI tutorial, check the official Firebase documentation.
Now let’s continue with Step 6 using our manual setup…
Step 6: Initialize Firebase in Your Flutter Code
Firebase must be initialized before your app can use any Firebase services.
6.1 Open main.dart
Open the lib/main.dart file in your Flutter project.
6.2 Import Firebase Core
At the top of the file, add this import:
import 'package:firebase_core/firebase_core.dart';
Your imports should look like:
import 'package:flutter/material.dart';
import 'package:firebase_core/firebase_core.dart';
6.3 Modify the main() Function
Replace your existing main() function with this:
void main() async {
  WidgetsFlutterBinding.ensureInitialized();
  await Firebase.initializeApp();
  runApp(const MyApp());
}
What this does:
async: Makes the main function asynchronous so it can wait for Firebase
WidgetsFlutterBinding.ensureInitialized(): Ensures Flutter is ready before initializing Firebase
await Firebase.initializeApp(): Connects your app to Firebase before anything else runs
runApp(const MyApp()): Starts your Flutter app after Firebase is ready
6.4 Complete Example
Here’s what your basic main.dart should look like:
import 'package:flutter/material.dart';
import 'package:firebase_core/firebase_core.dart';

void main() async {
  WidgetsFlutterBinding.ensureInitialized();
  await Firebase.initializeApp();
  runApp(const MyApp());
}

class MyApp extends StatelessWidget {
  const MyApp({Key? key}) : super(key: key);

  @override
  Widget build(BuildContext context) {
    return MaterialApp(
      title: 'Firebase Demo',
      theme: ThemeData(
        primarySwatch: Colors.blue,
      ),
      home: const MyHomePage(),
    );
  }
}

class MyHomePage extends StatelessWidget {
  const MyHomePage({Key? key}) : super(key: key);

  @override
  Widget build(BuildContext context) {
    return Scaffold(
      appBar: AppBar(
        title: const Text('Firebase Setup Complete'),
      ),
      body: const Center(
        child: Text(
          'Firebase is connected!',
          style: TextStyle(fontSize: 24),
        ),
      ),
    );
  }
}
Step 7: Test Your Firebase Setup
Now it’s time to verify everything works.
7.1 Run the App
In your terminal, run:
flutter run
Or press F5 in VS Code, or click Run in Android Studio.
7.2 What to Look For
Success indicators:
The app launches normally without errors
No Firebase-related error messages in the terminal
The console shows something like:
[FirebaseCore] Successfully initialized Firebase
7.3 Verify in Firebase Console
Go back to your Firebase Console project dashboard. You should see your app listed under “Your apps” with a confirmation that it’s connected.
7.4 Common Errors and Solutions
If you see errors, don’t worry. Here are the most common issues:
Error: “Unable to locate google-services.json”
Problem: Configuration file in wrong location
Solution: Ensure google-services.json is in android/app/, not android/
Error: “Duplicate class com.google.android.gms”
Problem: Version conflicts in dependencies
Solution: Run flutter clean then flutter pub get
Error: “No Firebase App ‘[DEFAULT]’ has been created”
Problem: Firebase not initialized or initialized incorrectly
Solution: Verify Firebase.initializeApp() is called in main() before runApp()
Error: “MissingPluginException”
Problem: Platform files not properly configured
Solution:
- Run
flutter clean - Delete
ios/Podsandios/Podfile.lock - Run
cd ios && pod install && cd .. - Run
flutter runagain
iOS Build Failures
Problem: CocoaPods not properly installed
Solution:
- Ensure CocoaPods is installed:
sudo gem install cocoapods - Delete
ios/Podsfolder - Run
pod installin the ios directory
For more troubleshooting help, see our Flutter Mistakes to Avoid guide.
Step 8: What You Can Do Next
Your Flutter app is now connected to Firebase. Here’s what you can add:
Available Firebase Services
Firebase Authentication Add user login, signup, and account management. See our Firebase Authentication Tutorial.
Cloud Firestore Store and sync data in real-time. Check out Cloud Firestore Basics.
Firebase Storage Upload and download files, images, and videos. Learn in Firebase Storage Guide.
Cloud Messaging (FCM) Send push notifications to users. Tutorial: Push Notifications with FCM.
Firebase Analytics Track how users interact with your app.
Crashlytics Monitor and fix app crashes automatically.
Each service requires adding one more Firebase package to your pubspec.yaml and some additional code.
Recommended Learning Path
If you’re new to Firebase, follow this order:
- Start with Authentication – Most apps need user accounts
- Add Firestore – Store user data and app content
- Learn Storage – When you need to handle images/files
- Implement Notifications – Boost user engagement
- Add Analytics – Understand user behavior
Example: Adding Firebase Authentication
To give you a preview, here’s how simple it is to add another Firebase service:
Add to pubspec.yaml:
firebase_auth: ^4.15.3
Note: Version numbers in this guide are examples. Check pub.dev/packages/firebase_auth for the latest version available in 2026.
Run:
flutter pub get
That’s it. You’re ready to implement login features.
For the complete authentication tutorial, see Firebase Authentication in Flutter.
Common Beginner Mistakes (And How to Avoid Them)
From my experience setting up Firebase multiple times, these are the mistakes that cost the most time:
Mistake 1: Wrong Package Name
Problem: Using the wrong package name when registering with Firebase
How to avoid: Copy the package name directly from android/app/build.gradle, don’t type it manually
How to fix: In Firebase Console, go to Project Settings → Your apps → Delete the app and re-register with correct package name
Mistake 2: Configuration File in Wrong Location
Problem: Placing google-services.json in android/ instead of android/app/
How to avoid: Follow the file path exactly as shown in this guide
How to fix: Move the file to the correct location and rebuild
Mistake 3: Forgetting to Initialize Firebase
Problem: Not calling Firebase.initializeApp() before using Firebase services
How to avoid: Always initialize in main() before runApp()
How to fix: Add the initialization code shown in Step 6
Mistake 4: Not Running pod install
Problem: iOS build fails because CocoaPods dependencies aren’t installed
How to avoid: Always run pod install after adding Firebase to iOS
How to fix: Run cd ios && pod install && cd ..
Mistake 5: Using Outdated Package Versions
Problem: Using old Firebase package versions that don’t work together
How to avoid: Check pub.dev for the latest versions. Package versions change frequently—what’s current when you read this guide might be different from the examples shown, but the setup process remains the same.
How to fix: Update all Firebase packages to compatible versions. If you get dependency conflicts, try running flutter pub upgrade
Mistake 6: Skipping flutter clean
Problem: Cached build files causing mysterious errors
How to avoid: Run flutter clean before running the app for the first time after Firebase setup
How to fix: flutter clean then flutter pub get then flutter run
Avoiding these mistakes will save you hours of debugging. I learned all of them the hard way so you don’t have to.
Understanding What Each File Does
For those curious about what you just configured:
google-services.json (Android) Contains Firebase project credentials, API keys, and configuration. The Gradle plugin reads this file during build time.
GoogleService-Info.plist (iOS) The iOS equivalent of google-services.json. Contains the same type of configuration data.
firebase_core package The foundational package that all other Firebase services depend on. Handles initialization and core functionality.
apply plugin: 'com.google.gms.google-services' A Gradle plugin that processes your google-services.json file and makes the credentials available to your app.
Firebase.initializeApp() Establishes the connection between your Flutter app and your Firebase project using the configuration files.
You don’t need to understand all the technical details to use Firebase, but knowing what these pieces do helps when troubleshooting.
Related Deadloq Tutorials
Firebase Series:
- Why Firebase Is Popular in Flutter Apps – Understanding Firebase benefits
- Firebase Authentication in Flutter – Add user login to your app
- Cloud Firestore Basics – Store and retrieve data
- Firebase Storage Guide – Handle images and files
Flutter Fundamentals:
- Flutter Introduction and Core Concepts – Flutter basics for beginners
- Installing Flutter on Windows – Complete Windows setup
- Creating Flutter Projects in VS Code – Project setup essentials
Flutter State Management:
- State Management with Provider – Works great with Firebase data
Projects:
- Building a Flutter Calculator App – Your first Flutter project
- Flutter Beginner Projects – More practice apps
Best Practices:
- Flutter Mistakes to Avoid – Common pitfalls and solutions
- Flutter Best Practices – Write better Flutter code
Final Thoughts
Firebase setup might feel overwhelming the first time, but it’s mostly a one-time process. Once connected, Firebase becomes a powerful backend that lets you focus entirely on building your Flutter app.
The setup process I just walked you through took me three hours the first time I did it. I made every mistake: wrong package names, files in wrong places, forgot initialization, skipped pod install. Each error taught me something.
Now I can set up Firebase in 15 minutes. You’ll get faster too. The second time you do this, it’ll feel much easier. By the third time, it’ll be automatic.
For most Flutter developers learning to build real apps, Firebase is the fastest way to turn an idea into something that actually works with user accounts, data storage, and all the features users expect.
Don’t let the setup process discourage you. Once you get past this initial configuration, you’ll wonder how you ever built apps without Firebase.
Quick Reference Checklist
Use this checklist for your next Firebase setup:
Before You Start:
- [ ] Verify Flutter is installed (flutter doctor)
- [ ] Have a Google account ready
- [ ] Check pub.dev for latest firebase_core version
Firebase Console:
- [ ] Create Firebase project
- [ ] Add Android app (register package name)
- [ ] Download google-services.json
- [ ] Add iOS app if needed
- [ ] Download GoogleService-Info.plist if needed
Flutter Project:
- [ ] Place google-services.json in android/app/
- [ ] Place GoogleService-Info.plist in ios/Runner/
- [ ] Add firebase_core to pubspec.yaml
- [ ] Run flutter pub get
Android Configuration:
- [ ] Add Google Services plugin to android/build.gradle
- [ ] Apply plugin in android/app/build.gradle
iOS Configuration:
- [ ] Run pod install in ios directory
- [ ] Verify iOS deployment target is 11.0+
Flutter Code:
- [ ] Import firebase_core in main.dart
- [ ] Add WidgetsFlutterBinding.ensureInitialized()
- [ ] Add await Firebase.initializeApp()
- [ ] Make main() async
Testing:
- [ ] Run flutter clean
- [ ] Run flutter pub get
- [ ] Run flutter run
- [ ] Verify no Firebase errors
- [ ] Check Firebase Console for connection