The first time I tried building a multi-screen Flutter app, I was completely lost. I had a login screen and wanted to navigate to a home screen after login, but I had no idea how to make it work. I tried creating new widgets, setting variables, nothing worked. Then I discovered Navigator, and everything clicked.
Most Flutter apps need multiple screens—login pages, detail pages, settings, profiles, shopping carts. Learning how to move between these screens properly is essential for building real apps.
Part of the Flutter Documentation Series:
- Previous: State Management Basics
- Next: Styling & Themes
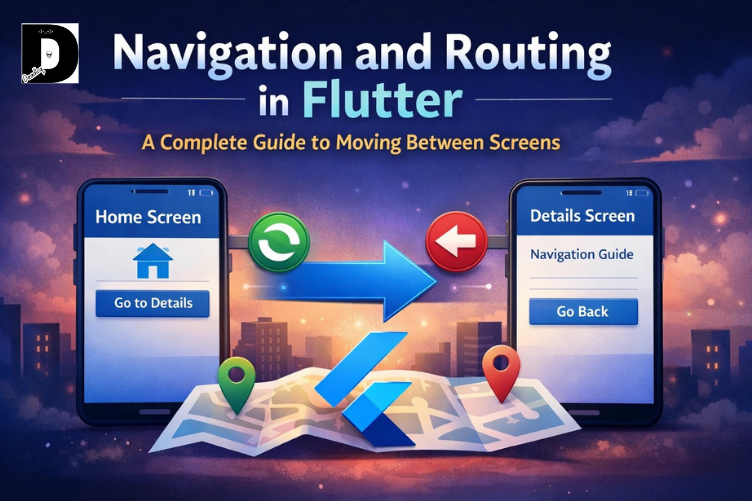
What Is Navigation and Routing in Flutter?
Navigation in Flutter is the process of moving from one screen to another. Think of it like flipping through pages in a book, except Flutter manages this digitally using a stack-based system.
Navigation: The action of moving between different screens or pages in your app.
Routing: The system that defines, manages, and handles how these screen transitions happen.
In Flutter:
- Each screen is a Widget
- Screens are managed using a stack (last in, first out)
- The Navigator widget controls this stack
- Moving forward is called “pushing” a route
- Going back is called “popping” a route
According to the official Flutter navigation documentation, Flutter provides a complete system for navigating between screens and handling deep links, with the Navigator widget being central to this functionality.
Understanding the Navigation Stack
Flutter uses a stack-based navigation system, similar to a stack of plates. You can only add or remove from the top.
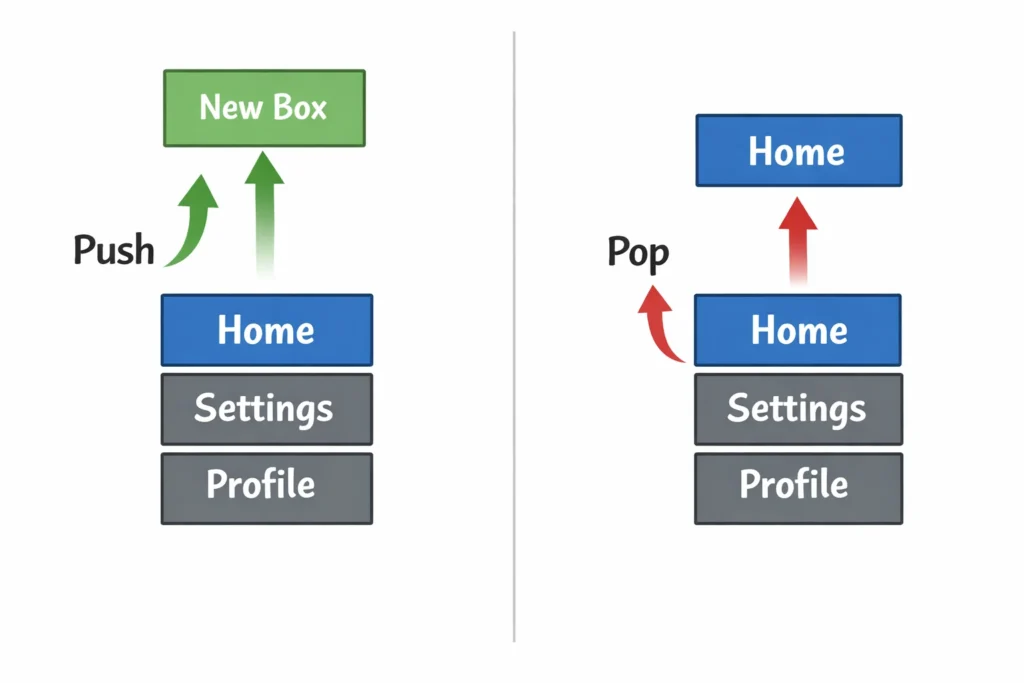
Here’s how it works:
Home Screen
    ↓ push (add on top)
Home Screen → Details Screen
    ↓ pop (remove from top)
Home Screen
When you navigate forward, you push a new screen onto the stack. When you go back, you pop the current screen off the stack, revealing the one underneath.
I remember being confused about why Flutter uses a stack instead of just switching screens. The reason is brilliant—Flutter keeps all previous screens in memory, so when you go back, everything is exactly as you left it. Your scroll position, form data, everything persists.
For a deeper understanding of Flutter’s widget system and how these screens are built, check out the official Flutter documentation.
Basic Navigation Using Navigator.push
Let me show you the most common navigation pattern you’ll use in Flutter apps. This is what the Flutter cookbook recommends for basic navigation.
Navigate to a New Screen
Navigator.push(
  context,
  MaterialPageRoute(
    builder: (context) => SecondScreen(),
  ),
);
Breaking this down:
- context: Tells Flutter where you are in the widget tree
- MaterialPageRoute: Creates an Android-style transition animation
- builder: A function that returns the widget to display
The MaterialPageRoute gives you that smooth slide-in animation you see in Android apps. For iOS-style animations, you’d use CupertinoPageRoute instead. We covered these platform differences in Material vs Cupertino Widgets.
Returning to Previous Screen
Navigator.pop(context);
This removes the current screen from the stack and takes you back. Simple as that.
Example: Building a Two-Screen App
Let me show you a complete working example. This is similar to what I built when learning navigation and routing in Flutter.
First Screen
class FirstScreen extends StatelessWidget {
  @override
  Widget build(BuildContext context) {
    return Scaffold(
      appBar: AppBar(title: Text('First Screen')),
      body: Center(
        child: ElevatedButton(
          child: Text('Go to Second Screen'),
          onPressed: () {
            Navigator.push(
              context,
              MaterialPageRoute(
                builder: (context) => SecondScreen(),
              ),
            );
          },
        ),
      ),
    );
  }
}
Second Screen
class SecondScreen extends StatelessWidget {
  @override
  Widget build(BuildContext context) {
    return Scaffold(
      appBar: AppBar(title: Text('Second Screen')),
      body: Center(
        child: ElevatedButton(
          child: Text('Go Back'),
          onPressed: () {
            Navigator.pop(context);
          },
        ),
      ),
    );
  }
}
Run this code and you’ll see the basic push/pop navigation in action. The back button in the AppBar is automatically added by Flutter—another nice touch I appreciated when learning.
If you’re just getting started with Flutter, make sure you understand Stateless vs Stateful Widgets before diving deeper into navigation and routing.
Named Routes in Flutter
When I started building larger apps, I quickly realized that writing MaterialPageRoute(builder: (context) => SomeScreen())everywhere was messy and repetitive. That’s where named routes come in.
Important Note: The Flutter team now recommends against using named routes for most applications. They point out that named routes can handle deep links, but the behavior is always the same and can’t be customized. Flutter also doesn’t support the browser forward button for applications using named routes. For these reasons, they suggest using a routing package like go_router instead. However, named routes are still useful for learning and simple apps.
Defining Routes
Set up your routes in MaterialApp:
MaterialApp(
  initialRoute: '/',
  routes: {
    '/': (context) => HomeScreen(),
    '/profile': (context) => ProfileScreen(),
    '/settings': (context) => SettingsScreen(),
  },
  onUnknownRoute: (settings) => MaterialPageRoute(
    builder: (context) => NotFoundScreen(),
  ),
);
Navigating Using Named Routes
Navigator.pushNamed(context, '/profile');
Much cleaner, right? All your routes are defined in one place, making it easier to see your app’s structure.
Going Back
Same as before:
Navigator.pop(context);
Named routes were my go-to approach until I learned about their limitations. They work great for simple apps but break down with complex deep linking scenarios and web support.
Best Practice: Route Constants
To improve maintainability, create a constants file for your routes:
class Routes {
  static const String home = '/';
  static const String profile = '/profile';
  static const String settings = '/settings';
  static const String productDetail = '/product-detail';
}

// Usage
Navigator.pushNamed(context, Routes.profile);
This prevents typos and makes refactoring easier. I learned this the hard way after spending an hour debugging a route that had a typo.
Passing Data Between Screens
One of the most common questions I had when learning: “How do I send data to the next screen?”
Passing Data While Navigating
Navigator.push(
  context,
  MaterialPageRoute(
    builder: (context) => DetailScreen(
      title: 'Flutter Navigation',
      description: 'Learn navigation and routing',
    ),
  ),
);
Receiving Data
class DetailScreen extends StatelessWidget {
  final String title;
  final String description;

  DetailScreen({
    required this.title,
    required this.description,
  });

  @override
  Widget build(BuildContext context) {
    return Scaffold(
      appBar: AppBar(title: Text(title)),
      body: Center(child: Text(description)),
    );
  }
}
This approach uses constructor parameters, which is type-safe and clean. I prefer this over named route arguments because the compiler catches mistakes.
Passing Data with Named Routes
If you’re using named routes, you can pass arguments:
Navigator.pushNamed(
  context,
  '/profile',
  arguments: {'userId': '123'},
);
Receiving in the destination screen:
final args = ModalRoute.of(context)?.settings.arguments as Map<String, dynamic>?;
final userId = args?['userId'] ?? 'Unknown';
This works but isn’t type-safe. You have to cast the arguments manually, which can cause runtime errors. That’s why I switched to constructor-based data passing.
Receiving Data Back from a Screen
You can also receive data when returning from a screen:
// Navigate and wait for result
final result = await Navigator.push(
  context,
  MaterialPageRoute(builder: (context) => EditScreen()),
);

if (result != null) {
  print('Received: $result');
}

// In the EditScreen, return data when user presses save
ElevatedButton(
  onPressed: () {
    Navigator.pop(context, 'Updated data');
  },
  child: Text('Save'),
)
For complex data flow between screens, you’ll eventually need state management solutions like Provider, which we covered in State Management Basics.
Replacing Screens (pushReplacement)
Sometimes you don’t want users going back to the previous screen. Login flows are a perfect example—after logging in, you don’t want the back button taking users back to the login screen.
pushReplacement
Navigator.pushReplacement(
  context,
  MaterialPageRoute(builder: (_) => HomeScreen()),
);
This replaces the current screen instead of stacking on top. The user can’t press back to return.
Common uses:
- Login → Home (after successful login)
- Splash screen → Main screen
- Onboarding → App
I used this exact pattern in my first real Flutter project for the splash screen transition.
Removing All Previous Screens (pushAndRemoveUntil)
For situations like logout, you want to clear the entire navigation stack and start fresh.
pushAndRemoveUntil
Navigator.pushAndRemoveUntil(
  context,
  MaterialPageRoute(builder: (_) => LoginScreen()),
  (route) => false,
);
The (route) => false parameter tells Navigator to remove all previous routes. Setting it to false means “don’t keep any routes.”
Common uses:
- Logout flows
- Completing onboarding
- Authentication state changes
This was crucial when I built authentication flows. Without it, users could press back multiple times and end up in weird states.
Handling Unknown Routes and Errors
Regardless of which navigation approach you choose, handling unknown routes is crucial for good user experience.
Error Handling with Named Routes
MaterialApp(
  routes: {
    '/': (context) => HomeScreen(),
    '/profile': (context) => ProfileScreen(),
  },
  onUnknownRoute: (settings) {
    return MaterialPageRoute(
      builder: (context) => NotFoundScreen(),
    );
  },
)
Creating a User-Friendly 404 Screen
class NotFoundScreen extends StatelessWidget {
  @override
  Widget build(BuildContext context) {
    return Scaffold(
      appBar: AppBar(title: Text('Page Not Found')),
      body: Center(
        child: Column(
          mainAxisAlignment: MainAxisAlignment.center,
          children: [
            Icon(Icons.error_outline, size: 64, color: Colors.grey),
            SizedBox(height: 16),
            Text('The page you are looking for does not exist.'),
            SizedBox(height: 16),
            ElevatedButton(
              onPressed: () => Navigator.pushReplacementNamed(context, '/'),
              child: Text('Go Home'),
            ),
          ],
        ),
      ),
    );
  }
}
Best Practices for Navigation and Routing
After building several Flutter apps, here’s what I’ve learned about navigation and routing:
Start simple, upgrade when needed. Use basic push/pop for your first few apps. Don’t jump straight to complex routing packages.
Keep navigation logic out of UI code. As your app grows, create separate navigation functions or services. This makes testing easier and keeps your widget code clean.
Handle the back button properly. Always ensure users can navigate back logically. Nothing frustrates users more than feeling trapped in a screen.
Consider user state between screens. Remember that Flutter keeps previous screens in memory. This is usually good (preserves state) but can cause issues with stale data. Plan accordingly.
Test navigation flows thoroughly. Navigation bugs are some of the worst user experiences. Test all possible paths through your app.
Use route constants. Define route names as constants to prevent typos and make refactoring easier.
For larger apps, check out Flutter Best Practices for more architectural guidance.
Common Mistakes I Made (And How to Avoid Them)
Using BuildContext from a disposed widget. This happens when you call Navigator after a widget has been removed. I lost hours debugging this. Always check if the widget is still mounted before navigating in async operations.
Hardcoding routes everywhere. I did this in my first app and regretted it immediately when I needed to change a route. Define routes in one place, whether using named routes or constants.
Mixing navigation logic inside business logic. Keep navigation separate from your app’s business logic. This makes code more testable and maintainable.
Not handling edge cases. What happens if users press back rapidly? Or if they try to navigate while a request is loading? Handle these scenarios explicitly.
Overusing anonymous routes in large apps. Every MaterialPageRoute creates an anonymous route. In large apps, this becomes hard to track. Use named routes or routing packages instead.
Limitations of Default Navigation
Flutter’s built-in navigation works well for many apps, but it has limitations:
- No deep linking support with named routes—Web URLs and app deep links don’t work well with the basic routing system
- No browser back button support—Web apps need special handling
- Complex nested navigation is messy—Tab bars with their own navigation stacks get complicated fast
- Testing is harder—Anonymous routes are difficult to test thoroughly
This is why most production Flutter apps use routing packages. According to the Flutter documentation on routing, apps with advanced navigation requirements should use packages like go_router.
Modern Routing Solutions
When you’re ready to level up from basic navigation, these packages solve common problems:
go_router: The Flutter team’s recommended routing package. It handles deep linking, browser navigation, and complex routing scenarios. Most new Flutter apps should start here.
auto_route: Generates routing code for you based on annotations. Reduces boilerplate significantly.
beamer: Another declarative routing solution focused on clean code and nested navigation.
I recommend learning basic Navigator first (which you just did), building 2-3 small apps, then exploring go_router. The concepts you learned here apply to all routing solutions.
For more Flutter packages and tools, see App Development Packages.
What’s Next?
In the next article, we’ll cover Styling & Themes in Flutter. You’ll learn how to:
- Apply consistent colors and fonts app-wide
- Create light and dark themes
- Use ThemeData effectively
- Build visually polished apps
Later in this series, we’ll revisit navigation when we cover Networking in Flutter and show you how to handle navigation during API calls and loading states.
Summary
Navigation and routing in Flutter starts with understanding these core concepts:
- Flutter uses stack-based navigation with push and pop
- Navigator.push() adds screens, Navigator.pop() removes them
- Named routes organize routing code but have limitations for web and deep linking
- Data can be passed between screens via constructors or arguments
- pushReplacement and pushAndRemoveUntil handle special navigation cases
- Modern apps often use routing packages like go_router for advanced features
Master these fundamentals before moving to advanced routing packages. Every Flutter developer builds on this foundation.
Related Articles in This Series:
- User Interaction & Input
- Essential Flutter Widgets
- Layouts in Flutter
- Forms & Validation
- State Management Basics
Additional Resources:
- Flutter Navigation & Routing (standalone deep dive)
- Beginner Flutter Projects
- Creating Flutter Projects in VS Code
- Cross-Platform Development with Flutter
Having trouble with navigation and routing? Drop a comment below. I’ve probably hit the same issue and can help you debug it.